Pre-Quilt Class Questions & Sunset on the Sound ~ Clue #8!
How is everyone surviving February? Can you believe we are half way through the Sunset on the Sound mystery clues? Clue #8 is revealed today!
It's been another busy week between trying to complete two quilts for my next two pattern releases and tons of emails! I mean tons!
You can tell we are approaching Quilt Show season! AQS Quiltweek in Lancaster is only a few weeks away and I'm teaching five classes there (there are a few seats left in Calm Seas and two seats in Sparkle if you are interested - AQS Classes), and I'm starting to get a lot of questions on fabric selection, cutting instructions, etc. I thought it might be helpful to address some of them in today's post.
First of all, let me state, I love getting emails from everyone. Finished quilt emails are my favorite. I have no issue answering emails, but there are a few questions that always come up that I might be able to address in general that could help many of you about to take classes this quilt season.
Commonly asked pre-Quilt Class questions:
Fabric Selection - Can you help me with Fabric Selection?
I usually cover some fabric guidance in my Class Supply List, so always read that, but of late these questions have made me think back to a student's suggestion that was suggested to me last summer, at Maine Quilts. She suggested that I do a Blog series on picking out fabric for each of my patterns. I was thinking that might be a good idea, I don't know if there is any interest in that series, but if there were, I could do the series and then put the link in my class supply list. Maybe that would help.
What are your thoughts, is that something that would interest you? Please post your comment below.
Change the size of the Quilt - Can you help me figure it out?
Now, most of my patterns offer 3-6 sizes, but there are a few older ones that don't. My technique classes are usually just a small wall hanging, as the goal of the class it to teach you the technique. For my Quilt Patterns, I try to cover as many sizes as a quilt design will allow. To create the design, I'm often limited into a block x block grid. In other words, the quilt may need to have a odd number of blocks by a odd number of blocks to complete the design, so based on that and the size of the units, it dictates what quilt sizes are possible. So, I do what I can.
So, if you want to change the size of quilt and you are taking a Quilt Class, which are often limited to 3 to 6 hours, my suggestion would always be to learn the technique in class. In a day or less class, you are really only going to get a few blocks completed. So, if you aren't following the pattern sizes, either use scraps and cut enough for a two blocks of each of the blocks in the quilt, and learn the technique. Or, buy extra fabric if you plan to make it larger, cut enough for one of the published sizes, and learn the technique(s) in class. Then, determine if you want to make it larger or smaller, after you understand the design better. I'm always happy to talk to you after class about your ideas, however it is very difficult to do via email. Does that make sense?
Change the size of the Block - Can you help me figure it out?
Now, most of time I've gone with a specific size of the block because of the units sizes or because of the quilt size, either way it was a conscience decision. Therefore, my recommendation would be to use scraps and cut enough for a two blocks of each of the blocks in the quilt, and learn the technique using the published size of the block. After learning the technique and more about the design, if you want to change the size of the block, you can do it then. When you are in a Quilt Class, limited to 3-6 hours, that has 20-25 students, it is very difficult to provide instructions for alternate sizes, so learn the technique and go from there.
Believe me, I was one to alter another's patterns but when you are taking a quilt class, you really only have enough time to learn the techniques. Don't stress yourself out with trying to do math to alter the finished quilt. Master the technique in class and then make the changes you want.
Don't want to use the Sponsored Machine - Can I bring my own?
I will always direct you to the show organizer, but the answer is going to be no. Those Machine Manufacturers pay to have their machines in the classroom. Yep, they pay. So, you will need to use that machine. Most of the quilt shows state the machine manufacturer on the class description ahead of time. Most of the time, I am not made aware of the model. Sorry. I totally understand that you are worried about starting a quilt on one machine and finishing it on your home machine. So, guess what, I'm going back to make recommendation for the last two questions. 😁Use scraps and cut enough for a two blocks of each of the blocks in the quilt, and learn the technique on the class machine, go home and use your real fabric to make the quilt.
I hope that helps some of you that take Quilt Classes at Quilt Shows. Quilt Classes are wonderful, you are exposed to several National teachers and technique options at one venue. You can't beat it. I highly recommended and I enjoy teaching at Quilt Shows each year! Focus on learning the techniques. With the short window of class time, it is all about the technique and understanding the design.
By the way, my answers would be totally different if you were attending a multi-day retreat. Maybe I will cover that in another blog post.
Now for Clue #8 of my Sunset on the Sound Mystery Series!
Before I get started on today's clue, if you are just joining us for the Sunset on the Sound Mystery Series, you can get details on Fabric Requirements or details on the series in my early blog posts: start with Join Me for my Mystery Blog Post. Then go to Clue #1 Blog Post, Clue #2 Blog Post, Clue #3 Blog Post, Clue #4 Blog Post, Clue #5 Blog Post, Clue #6 Blog Post, and then Clue # 7 Blog Post.
If you want to join the Mystery series, make sure you subscribe to my mailing list, to received my weekly newsletter announcing the clues: Sign up for Mailing List
Also, if you want to join the SOTS Facebook group, please remember to answer the questions to admit you to the group. Also, make sure you are downloading your clues! And if you have friends that want to join in the fun, tell them to hop to it, Clue #1 will only be up for another week.
Okay, Clue #8! Split-Rects #2
Clue #8 - We will be using our Color 2: Medium (M2) and Background (BG) to make Split Rects #2 units! You will need the Split Rects tool for this week's clue. If you do not have one, you can purchase it in my Etsy shop.

Split Rect #2 are very similar to Clue #6's Split Rects #1, however they are different, so please read the Download carefully and read my tips/reminders below.
Differences between Split Rect #1 and Split Rects #2"
It's been another busy week between trying to complete two quilts for my next two pattern releases and tons of emails! I mean tons!
You can tell we are approaching Quilt Show season! AQS Quiltweek in Lancaster is only a few weeks away and I'm teaching five classes there (there are a few seats left in Calm Seas and two seats in Sparkle if you are interested - AQS Classes), and I'm starting to get a lot of questions on fabric selection, cutting instructions, etc. I thought it might be helpful to address some of them in today's post.
First of all, let me state, I love getting emails from everyone. Finished quilt emails are my favorite. I have no issue answering emails, but there are a few questions that always come up that I might be able to address in general that could help many of you about to take classes this quilt season.
Commonly asked pre-Quilt Class questions:
Fabric Selection - Can you help me with Fabric Selection?
I usually cover some fabric guidance in my Class Supply List, so always read that, but of late these questions have made me think back to a student's suggestion that was suggested to me last summer, at Maine Quilts. She suggested that I do a Blog series on picking out fabric for each of my patterns. I was thinking that might be a good idea, I don't know if there is any interest in that series, but if there were, I could do the series and then put the link in my class supply list. Maybe that would help.
What are your thoughts, is that something that would interest you? Please post your comment below.
Change the size of the Quilt - Can you help me figure it out?
Now, most of my patterns offer 3-6 sizes, but there are a few older ones that don't. My technique classes are usually just a small wall hanging, as the goal of the class it to teach you the technique. For my Quilt Patterns, I try to cover as many sizes as a quilt design will allow. To create the design, I'm often limited into a block x block grid. In other words, the quilt may need to have a odd number of blocks by a odd number of blocks to complete the design, so based on that and the size of the units, it dictates what quilt sizes are possible. So, I do what I can.
So, if you want to change the size of quilt and you are taking a Quilt Class, which are often limited to 3 to 6 hours, my suggestion would always be to learn the technique in class. In a day or less class, you are really only going to get a few blocks completed. So, if you aren't following the pattern sizes, either use scraps and cut enough for a two blocks of each of the blocks in the quilt, and learn the technique. Or, buy extra fabric if you plan to make it larger, cut enough for one of the published sizes, and learn the technique(s) in class. Then, determine if you want to make it larger or smaller, after you understand the design better. I'm always happy to talk to you after class about your ideas, however it is very difficult to do via email. Does that make sense?
Change the size of the Block - Can you help me figure it out?
Now, most of time I've gone with a specific size of the block because of the units sizes or because of the quilt size, either way it was a conscience decision. Therefore, my recommendation would be to use scraps and cut enough for a two blocks of each of the blocks in the quilt, and learn the technique using the published size of the block. After learning the technique and more about the design, if you want to change the size of the block, you can do it then. When you are in a Quilt Class, limited to 3-6 hours, that has 20-25 students, it is very difficult to provide instructions for alternate sizes, so learn the technique and go from there.
Believe me, I was one to alter another's patterns but when you are taking a quilt class, you really only have enough time to learn the techniques. Don't stress yourself out with trying to do math to alter the finished quilt. Master the technique in class and then make the changes you want.
Don't want to use the Sponsored Machine - Can I bring my own?
I will always direct you to the show organizer, but the answer is going to be no. Those Machine Manufacturers pay to have their machines in the classroom. Yep, they pay. So, you will need to use that machine. Most of the quilt shows state the machine manufacturer on the class description ahead of time. Most of the time, I am not made aware of the model. Sorry. I totally understand that you are worried about starting a quilt on one machine and finishing it on your home machine. So, guess what, I'm going back to make recommendation for the last two questions. 😁Use scraps and cut enough for a two blocks of each of the blocks in the quilt, and learn the technique on the class machine, go home and use your real fabric to make the quilt.
I hope that helps some of you that take Quilt Classes at Quilt Shows. Quilt Classes are wonderful, you are exposed to several National teachers and technique options at one venue. You can't beat it. I highly recommended and I enjoy teaching at Quilt Shows each year! Focus on learning the techniques. With the short window of class time, it is all about the technique and understanding the design.
By the way, my answers would be totally different if you were attending a multi-day retreat. Maybe I will cover that in another blog post.
Now for Clue #8 of my Sunset on the Sound Mystery Series!
Before I get started on today's clue, if you are just joining us for the Sunset on the Sound Mystery Series, you can get details on Fabric Requirements or details on the series in my early blog posts: start with Join Me for my Mystery Blog Post. Then go to Clue #1 Blog Post, Clue #2 Blog Post, Clue #3 Blog Post, Clue #4 Blog Post, Clue #5 Blog Post, Clue #6 Blog Post, and then Clue # 7 Blog Post.
If you want to join the Mystery series, make sure you subscribe to my mailing list, to received my weekly newsletter announcing the clues: Sign up for Mailing List
Also, if you want to join the SOTS Facebook group, please remember to answer the questions to admit you to the group. Also, make sure you are downloading your clues! And if you have friends that want to join in the fun, tell them to hop to it, Clue #1 will only be up for another week.
Okay, Clue #8! Split-Rects #2
Clue #8 - We will be using our Color 2: Medium (M2) and Background (BG) to make Split Rects #2 units! You will need the Split Rects tool for this week's clue. If you do not have one, you can purchase it in my Etsy shop.

Differences between Split Rect #1 and Split Rects #2"
- They are mirror images of each other. I promised. 😀
- This will change the way you lay out your strips to be sub cut.
- This will change the trim down line you use when lining up the Split Rect tool.
Here are a few tips for this week:
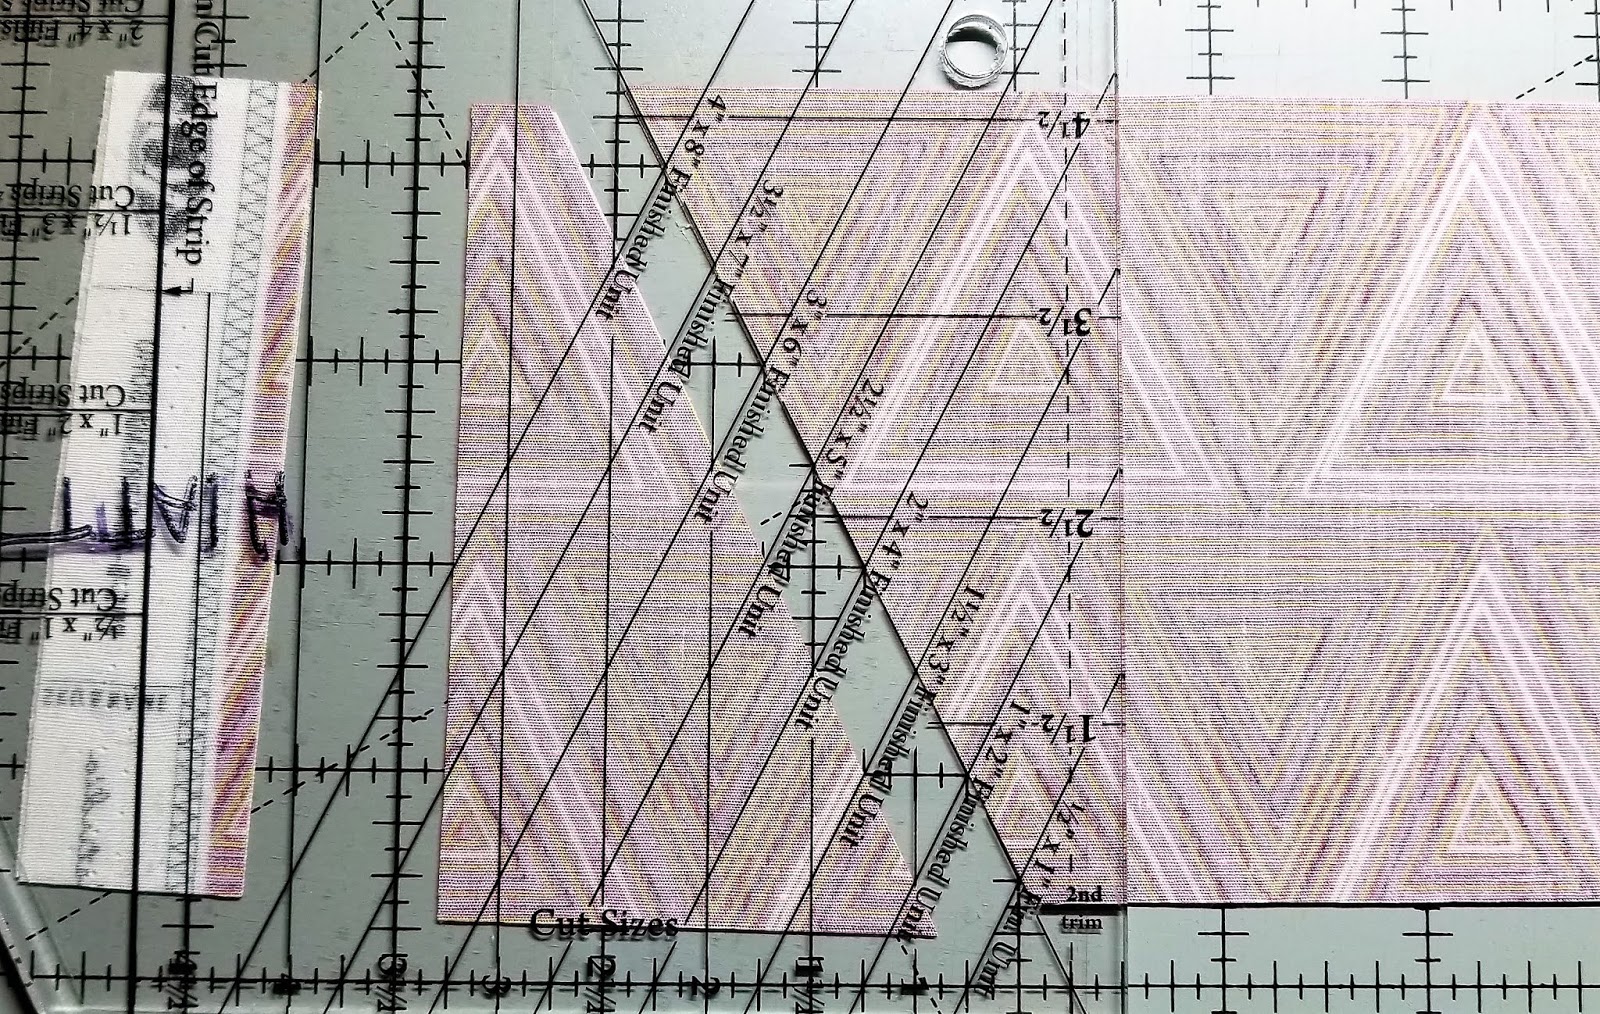
- For steps 1-5 - Place both your M2 and BG Strips Right Sides Down. The you will proceed to line up the ruler and trim, just like you did in Clue #6.
 |
| Right Handed - First cut |
 |
| Right Handed - Second cut |
 |
| Right Handed - Repeat First and Second cuts until you have enough |
 |
| Left Handed - First cut |
 |
| Left Handed - Second cut |
 |
| Left Handed - Repeat First and Second cuts until you have enough |
- Next, lay out your unit to form the proper angle. If you are using dual-sided fabric (solid, batik, etc) be very careful as it is easy to flip these. You may notice that I always drawing the unit on my paper plate to keep me straight.
 |
| Double check lay out if you are using dual sided fabric (solid, batik,etc) |
- For steps 6 and 7, you are going to sew them similar to Split Rect #1. You want to be careful when pressing these units, I highly recommend pressing the seam open and using a pressing stick
 |
| Set the seam |
 |
| Press seam open on Pressing Stick |
 |
| Press the seam on the front side |
- When trimming the units in steps 8-12, you will be position the unit the same way to cut; for right hand cutting place units horizontally, for left hand cutting place units vertically. However, this time you will be lining up with the proper size diagonally line, not the common diagonally as you did in Clue #6 for the Split Rect #1.
 |
| Right Handed - First trim |
 |
| Right Handed - Second trim |
 |
| Right Handed - Tada! Perfect! |
 |
| Left Handed - First Trim |
 |
| Left Handed - Second Trim |
 |
| Left Handed - Tada! Perfect |
- Tada! Perfect. Make sure you are referring to the Download for specific quantities and sizes.
Many of you are getting worried about the amount of fabric you have left, and while this is a Mystery I will share that we have a few things we will still need to cut, however for the majority we are finished making units. You will still need the fabric you have left, so don't go using it for something else. If you purchased the quantity recommended and you made use of your remnant strips between clues, you will be in good shape fabric wise.
We start construction next week!
I think that is it for today, I hope you found my tips for Split Rects #2 helpful and it help you understand the tool better. Also, I hope my advice on commonly asked pre-Quilt Class questions was helpful. Again, please do not hesitate to email me, that isn't my intend, just thought some of my general answers might be helpful.
Have a great week. We might be in for another wintery mix here in New England. I will have to see if it impacts my lecture at Twin States Modern Quilt Guild. Fingers crossed! Update = 2/22/2019 - Twin State Modern Quilt Guild has cancelled their Sunday meeting due to weather. I will update with a new date once scheduled.
Keep Stitching,
Michelle


I think your directions and fabric guidance are perfect. BUT, for beginners a separate blog might be helpful and would save you some time. Thanks Michelle. I'm really enjoying SOTS and your other patterns as well.
ReplyDeleteI agree with Nora. You’re directions and suggestions are wonderful, but for those like myself, who have a tendency to 2nd guess myself when it comes to color, I think having a blog to refer to would save you an immeasurable amount of time! I think I would benefit from Color 101, but timing isn’t working in my favor right now. I really like this Mystery Quilt especially the fact that it is pretty 'season contained'. My winter is the season I can be most consistent with my sewing.
ReplyDeleteMore information is always better. Those that need it can benefit from your expertise. Those that sew first and ask questions later can still enjoy reading! Your patterns are very detailed and very accommodating. A great value.
ReplyDeleteAny help on fabric selection would be appreciated
ReplyDeleteI looked at the pattern picture for class, the amount for each set of squares , then checked my stash. Once the squares cut, figured out background, outer border & backing at local shop. I took a picture of the finished quilt, changed it to b&w, then sent w/ msg to younger goddaughter for input as her sister was getting married. Approved so have collected required # fat quarters in various greys & touches of black. Background secured, just need backing. Class quilt will be my learning experience then can create wedding gift w/class quilt going to my charity project.
ReplyDelete