Yeah! We are here! Today we kick of the Best of the 60's Mystery Quilt Series. If you are just tuning in from weeks off the blog, make sure to go back and check out the last few weeks. Especially the week on separating your fabric.
Clue #1 - Dock of the Bay!
It was important to me that the first block be Dock of the Bay. While on vacation with some great quilting friends, I worked on this series taking the design from my head and making it a reality. Every evening we would sit on the dock of the “lake” and enjoy the sunset. As always, my fabulous group of friends were a great support to me in my crazy creativity quilting adventures. I thought it only fitting to have the first Block in this series be Dock of the Bay. Thanks Lynn, Terry Sue, Carol and Dan!Before we get started, one follow-up on the Stitchin Sister's Charter Club ~ Aspiring Stars.
 |
| Aspiring Star Sample ~ Setting 1 |
- We added a second series that will meet the 3rd Tuesday and Thursday evening of the month (one exception -June which will be the 2nd Tuesday.
- Meets January-June 2021 ~ Hybrid of Online and Virtual Classes!
- We will gather for a social arrival from 5:30p-6pm (arrive anytime), and then have the lessons from 6pm-9pm.
- Class limited to 20 people, a few seats remain.
- Discounted pricing through Sunday, December 6th.
For more details see: MORE INFO on Stichin Sister Charter Club ~Aspiring Stars
Best of the 60's Quilt Mystery - Let's get started
Important information - PLEASE READ
You will receive an email from Sendowl (noreply@sendowl.com) notifying you that clue has been posted.
You need to click on that link, in that email, to download the Clue.
Or, if you saved your original sign-up email, you can use the link to access any downloads, and make changes to your email setting.
You will have the Clue's step-by-step instructions and graphics, plus this Blog to help you with the Clue. I highly recommend you review the Blog post for tips first.
I'd also consider making a practice unit first, with scrap fabric, if you have never used the tool before.
NOTE: I can not changes your Sendowl settings, access your downloads, etc. You must log on yourself to do it. As stated in the sign-up email, it is important for you to save that email and be able to access those key links.
If it were me, I would click on that link, and save it to my favorites in my browser.
Very important - As many of you have been confused. If you purchased Clue Only, you will not have access to the Teachable platform or videos. That is limited to those taking the Class.
You will received an email from the Teachable platform (notifications@z.teachablemail.com or notification@m.teachablemail.com), notifying you that clue has been posted and the class is ready.
You will need to log on to your Teachable account, go to the Clue #1 items in the curriculum.
There you will find the downloadable Clue #1, which you can download or view (life-time) on the screen.
You will also have a series of Videos with step-by-step instructions, that you should watch in the order they are in the curriculum. You can stop and start them at any time. Rewind if needed, etc.
My suggestion is to watch the videos first, then re-watch and do. On your second watch, you can pause and do that step. Then continue watching, etc.
You can also access the Blog (https://sewonthego.blogspot.com/), if you would like, as it is public and open to all.
I'd also consider making a practice unit first, with scrap fabric, if you have never used the tool before.
NOTE: I can not changes your settings, in Teachable, nor change your email address or preferences. You need to do that. If you forgot your password, follow the prompts to reset your password.
Let's talk fabric. Here is my selection of fabric for Clue #1
 |
My Island Batik Peacock Galore and Moda's A Blooming Bunch - I went with Complementary fabrics, across the color wheel from each other.
|
 |
Make sure to prepare your fabric.
|
Cutting tips
 |
Make sure to cut your strips from selvage to end, cutting 20-22" strips depending on your fabric's HWOF length.
|
 |
I highly recommend you label your strip width with the size. This will help you in future steps, so that you don't have to keep re-measuring.
|
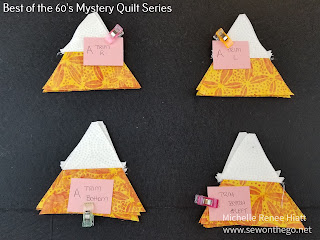
Sub-cutting - Triangles
 |
Label everything!
|
Double check that you have everything cut and placed on the right plate (unit).
 |
Double check!
|
Construction
If there is only one thing you listen to, it should be to ensure you have a 1/4" seam allowance. It will make or break your success in this series. Use a Quilter's Magic Wand (or other tools) to check it. Use scraps, sew, and check... but check!
 |
| MOST IMPORTANT - CHECK YOUR 1/4" SEAM - IT NEEDS TO BE A 1/4" |
Wait to you see what I have in store for you next week!
That is it for today!
Keep stitching,
Michelle


Comments
Post a Comment