Mid Appalachian Quilters!
Mid Appalachian Star is the Block for Clue #4. We will make (4) of them! Mid Appalachian Star is dedicated to all the MAQers!
 |
| Cheer and Merriment and Stitched Versions |
MAQ (Mid-Appalachian Quilters) is a fantastic event that takes place each July. I taught there annually from 2014-2019. I missed it this last year as their new date presents a schedule problem. It used to be held at Mount St. Mary in Emmitsburg, MD but moved to Gettysburg, PA in 2019. I loved teaching at MAQ, many of the same quilters would return year after year. Some great times have been had at their ice cream social and our evenings at the fountain. Miss you all!
This is a fantastic Block. We are introducing a new unit/tool to the Series. We will be making the Square-in-Square unit, with the Studio 180 Design Square Squared.
Here are my fabric selections:
 |
| Cheer and Merriment |
 |
| Stitched |
 |
| Cheer & Merriment Plate |
 |
| Stitched Plates |
 |
| Mark the back of the MD - pin stitched, cut and press |
 |
| Make sure to place the MD opposites |
 |
| I like to pin the sides to keep them straight and nice and nested |
 |
| Swirl the seam for less bulk |
 |
| Make sure they are pressed well |
 |
| Trim them down to the proper size measurement carefully taking time to make sure you line up everything. |
Unit B - Square-in-Square is new to the series! Let's go through some helpful tips.
The Center Square needs to be precision cut with the Square Squared to get that perfect center.
 |
| Right Handed |
 |
| Make sure to cut the extra from the top as the strip was slightly oversized on purpose. |
 |
| Left Handed |
 |
| Make sure to get the extra on the top. |
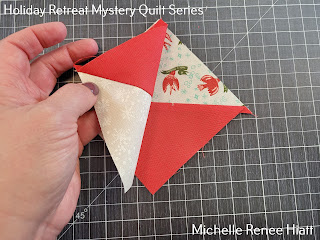
Next, you are going to sew on two side triangles, make sure to sew with the Center on top as it is the precision cut and you want to make sure you sew with that on top.
 |
| Take time to trim the dog ears before the next set |
Again, sew with the Center on top.
Now they are complete, but slightly oversized
Be careful to line up the center square seam lines with the proper sizing x's.
Woohoo! They are perfect. I love the Square Squared.
Unit C is a Half Square Triangle, so you got these.
Block Construction. These Block is going to come together easily. When laying out, your units, take notice of the pressing of your Quarter Square Triangles, placing the (8) that will be sewn (even eventually) with the Half Square Triangle, that their seams will nest.
Sew the units into rows.
 |
| Cheer and Merriment |
 |
| Stitched |
 |
| Cheer and Merriment |
 |
| Stitched |
Tada! I love this block.
 |
| Cheer and Merriment |
 |
| Stitched |
First start with the making your Quilt Center. Many of you are going to think that you should put this together in rows, and that just isn't how a Medallion quilt comes together. You start with the center, sewing those Rangeley Ribbon blocks together.
I would pin them well. Look for a points that you will want to precision pin . Better to pin now than have to rip later.
Tada! Press the seam open.
Once again, take your time to pin. Then those get pressed open as well.
Then, add Clue 4's Block, the Mid-Appalachian Star to the outside of (2) of the center of your Top/Bottom Borders. Triple check that you have them in the proper orientation.
Tada! Press the seam open.
Then, sew your Round A Side Borders and the center of your Top/Bottom Borders, placing Vergennes Vista with Cocalico Stars together.
Next, put your Round A Borders on your Quilt Center. You are going to put the sides on first, then the Top and Bottom. You will pin in all the same places you pinned prior, but also taking care of those those open seams.
Here is a better picture of my Cheer and Merriment version
Here is my Stitched version!
Love them! I can't wait to hear what you think of the reveal!
Keep Stitching,
Michelle


Comments
Post a Comment