Woohoo! Ticker Tape Parade - Clue #1
Woohoo! Today, I'm kicking off my Mini-Mystery, Ticker Tape Parade, which is a Jelly Roll challenge. I don't know about you, but I have a ton (and I mean ton) of Jelly Rolls. I've been collecting them for years. It is a great way to get a variety of fabric, often the full line, without a major purchase.
However, I've found that most Jelly Roll quilt patterns, all look the same to me, and haven't used many. Now, since I've been designing patterns, I've tried to change the fact that all Jelly Roll patterns look alike. I have a couple patterns that use Jelly Rolls for some of the sizes and I do not think they look like traditional Jelly Roll patterns. (Whirling Lemoynes and Moonlight Garden).
I've made a point to make sure the end result of this mystery doesn't look like a Jelly Roll quilt. I hope you love it as much as I do. In full honesty (you know I'm always upfront), we will be working with some small pieces, afterall we are starting with 2 1/2" strips. Therefore, it is really important that your Jelly Roll strips have a high contrast to your background. If you ignore this advice (given in the overview as well as last week's post), your pieces may get lost in the quilt. I give you this advice for a reason.
Speaking of the Overview, if you are just joining us, make sure to download and read the Overview and Important Items. You can find them: here
Ticker Tape Parade - Mini-Mystery - A Jelly Roll Challenge - Are you ready?
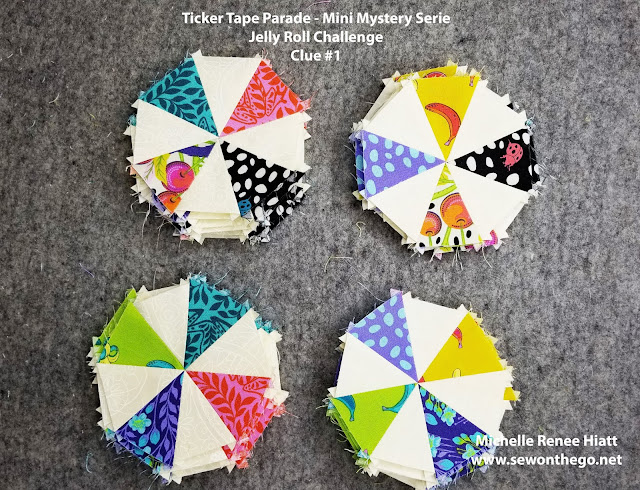
Let's get started! For Clue #1, we are going to be making Wedge Star Octagons this week with the Studio 180 Wedge Star Tool and Tucker Trimmer I.
The Studio 180 Wedge Star Tool is a newer tool, so I've given an excellent (if I do say so myself), pictorial below, on Clue #1, with helpful hints and a lesson on this new tool.
Note: This post will remain up as a blog post. There is no need to print unless you want it. However, the detailed instructions and Clue #1, must be downloaded, as they will only be up for the next 6 days -THE DOWNLOAD WILL BE REMOVED Thursday, Nov 14th. To download the clue, click here, and page down to the Ticker Tape Parade Section. Click on the Clue #1 file and save to your computer/tablet, etc.
Let's go... the technique I used in Clue #1, with the the Studio 180 Wedge Star Tool, is just one of many things you can do with this great tool!
Let's get organized
Gather your Jelly Roll, if you haven't already done so, we are going to analyze and divide your Jelly Roll Strips:
 Place your Jelly Roll Strips against your Background Fabric and remove any Jelly Roll Strips that do not provide enough contrast. I'm most concerned with the two strip sets that are at the far left - Do they have enough contrast to my background?
 After some debate, I've determined that I believe I will be okay with the to multiple one below, but not the one that was pictured below that... but in a pinch it may work. But definitely not the one to the far left above.
 You will need at least 35-36 usable Strips.
Therefore, you need to make sure that you only remove 4-5 unusable strips.
If you need to remove more than 5 strips, you will want to replace the strips with alternative strips or select a different Jelly Roll.
With the remaining 35-36 Strips, you will divide them into color ways, placing like colors together, creating a pile for each color way.
 Next, you are going to create (4) groups of (8) Strips and a 5th group with the (3-4) remaining strips and unusable strips.
When creating the (4) groups of (8) Strips, you will want to make sure you distribute the color as evenly as possible throughout the groups.
 Create Paper Plates/Baggies for each group.
 You will use Jelly Roll – Group 1 for Clue #1. Store all the other Groups in a safe place.

In the download, it will give you specifics. However, we are going to sub cut each of the strips in Group #1 into (2) HWOF Strips
(approximately 2½” x 20 ½”).
 Label and set aside one subset of Group 1 HWOF Strips for a later Clue.
 Use the other subset of Group 1 HWOF Strips for Step 1.
 Next, give your strips a good press with Best Press and a Mister. When we sub cut these strips, are pieces are going to have bias. Therefore, it is important that we take care not to stretch the fabric. Having Best Press (or another sizing) will help.


Now for the Studio 180 Wedge Star Tool!
Right - Handed
Position one of the strips on your cutting mat with the Wedge Star Tool on top, as shown in the diagram below. Align the small mark near the tip of the tool with the top of the strip and the proper size line on the tool at the bottom edge of the strip (this is where my strips being larger caused me a bit of stress - if you trimmed them, it should like line up perfect with the size).
Cut up one side of the tool and down the other. Right handed quilters will work from left to right. (Left handed quilters see below_
Left Handed:
All
Make sure you cut the proper quantity of Large Wedge, per strip, according to the download.
 TIP: Make sure you save the SCRAPS - The pattern will leverage almost the entire set of strips, therefore it is important to save all the scraps in case of mistakes.
 Next, cut the proper amount of Background Large Wedges, following the same method.
 Pair each of the Bright Large Wedges with Background Large Wedge, position right sides together and carefully align the raw edges. Position the Background Large Wedge on top to sew.
Tip: Start with a leader scrap first, to ensure the point doesn’t get pulled into your machine. Also, consider using a straight stitch plate on your machine.
 Stitch, starting at the sharp point, stitch a ¼” seam along one long edge of the Wedge pair. Repeat for the rest of the Large Wedges, making sure to position the Background Large Wedge on top each time to yield identical pairs.

 I strip piece these, therefore I use a Thread cutter to separate these. It will save you time.
 Make sure to set your seams. Heating the seam will drop the thread into the fabric, locking your stitches and creating flatter seams.
 Next, we are going to press all of these seams open. I can not stress enough, how much a seam stick will help this process.
 Then, press again.
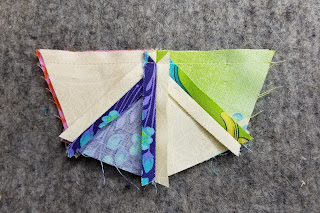
 Repeat for all the units. Next, we are going to partner these pairs up with another pair to create half Octagons. You could go completely scrappy, or organized scrappy, like I did.
 Tip: To determine, what I wanted to pair, I wanted to check my values. By changing my photo above to grayscale, I could set up the "darker" ones on the the top. And the "medium to lighter" ones on the bottom.
 IMPORTANT - Prior to stitching the Wedge pairs together, they do need to have their dog-ears trimmed and to ensure they create a perfect 90 degree angle.
You will do this by positioning a Wedge Pair on a cutting mat. Align the common diagonal on your Tucker Trimmer® with the seam to trim the “dog ears” and true up the 90° angle.
Note: There may be just a few “whiskers” trimmed here. Trim all Wedge Pairs.

 Left Handed
If you are Left Handed you will position the pair, so the 90° corner is in the upper left.


Next, you will partner up your Wedge Pairs. I partnered a "darker" pair with a "medium/lighter" pair.
 TIP: Shorten your stitch length to 1.8 - this will help secure your stitching, since we are going to be pressing all the seams open from here.
 Align the raw edges and ensure the seam between the Wedge pairs are on top of each other. This will help you ensure they are lined up well. Place a pin to hold, and stitch with your best ¼” seam to create half blocks.

 Press the seam open. Start with setting the seam.
 Again, I can not stress enough, how much a seam stick will help this process. It drops the other seams, so you don't mess those up and if you use steam, the wooden stick will actually wick the steam through, giving your units a perfect set seam.
 Press on the top.
 Position two Wedge Half sections right sides together. You could go completely scrappy here, or a bit of organized scrappy. The way I matched up my halves, I ended up with (4) different sets of Octagons.
 IMPORTANT - Ensure the halves' center seam matches, additionally you will want the points to match to create that perfect center.

 Put the Halves right sides together.
 IMPORTANT - Precision pin, by placing your needle through "V" created in the back of your top unit, and matching it to the pin of the bottom unit.
 With your needle perfectly straight...
 Place two pins beside the center seam... then remove the straight pin
 And I finish off with another 2 pin at the ends
 Next, stitch....
 Ensuring that you hit that "V"/point.
 Check out that seam! Perfect!
 Set the seam.
 Press open.
 Tada - perfection!
 Tip: At this point, I apply more Best Press with my Mister.

Repeat until you have all the Wedge Star Octagons for this Clue. At this point, we are going to stop. We have more work to do on these units, but that will be a later clue.

Make sure to share your completed clues in the Ticker Tape Parade Facebook Group (to join, make sure to answer the questions - if you do not, you will be automatically denied).
Woohoo! Well that is it for today!
Yesterday, I drove up to Vermont and I'm teaching my Fall Retreat at Quilting in Vermont (The Strong House Inn, Vergennes, VT) through Sunday. So, I better get down to breakfast. Make sure to follow me on Facebook to keep up with our progress.
Next week, I will be in NJ, teaching a Stay in your Bed Retreat at Pennington Quilt Works, in Pennington, NJ. Call Pennington Quilt Works if you would like to join us!
Keep Stitching and Stay Warm!
Michelle
However, I've found that most Jelly Roll quilt patterns, all look the same to me, and haven't used many. Now, since I've been designing patterns, I've tried to change the fact that all Jelly Roll patterns look alike. I have a couple patterns that use Jelly Rolls for some of the sizes and I do not think they look like traditional Jelly Roll patterns. (Whirling Lemoynes and Moonlight Garden).
I've made a point to make sure the end result of this mystery doesn't look like a Jelly Roll quilt. I hope you love it as much as I do. In full honesty (you know I'm always upfront), we will be working with some small pieces, afterall we are starting with 2 1/2" strips. Therefore, it is really important that your Jelly Roll strips have a high contrast to your background. If you ignore this advice (given in the overview as well as last week's post), your pieces may get lost in the quilt. I give you this advice for a reason.
Speaking of the Overview, if you are just joining us, make sure to download and read the Overview and Important Items. You can find them: here
Ticker Tape Parade - Mini-Mystery - A Jelly Roll Challenge - Are you ready?

Let's get started! For Clue #1, we are going to be making Wedge Star Octagons this week with the Studio 180 Wedge Star Tool and Tucker Trimmer I.
The Studio 180 Wedge Star Tool is a newer tool, so I've given an excellent (if I do say so myself), pictorial below, on Clue #1, with helpful hints and a lesson on this new tool.
Note: This post will remain up as a blog post. There is no need to print unless you want it. However, the detailed instructions and Clue #1, must be downloaded, as they will only be up for the next 6 days -THE DOWNLOAD WILL BE REMOVED Thursday, Nov 14th. To download the clue, click here, and page down to the Ticker Tape Parade Section. Click on the Clue #1 file and save to your computer/tablet, etc.
Let's go... the technique I used in Clue #1, with the the Studio 180 Wedge Star Tool, is just one of many things you can do with this great tool!
Let's get organized
Gather your Jelly Roll, if you haven't already done so, we are going to analyze and divide your Jelly Roll Strips:


Therefore, you need to make sure that you only remove 4-5 unusable strips.
If you need to remove more than 5 strips, you will want to replace the strips with alternative strips or select a different Jelly Roll.
With the remaining 35-36 Strips, you will divide them into color ways, placing like colors together, creating a pile for each color way.

When creating the (4) groups of (8) Strips, you will want to make sure you distribute the color as evenly as possible throughout the groups.


Also, you will want to measure your strips. My strips were actually slightly larger than 2 1/2". In hindsight, I wish I had trimmed them (my lesson learn and advice to you). I was able to work with them, eyeing the ruler in later steps, but it would have been easier if I trimmed them... you will understand in a bit.

Now for the Studio 180 Wedge Star Tool!
Right - Handed
Position one of the strips on your cutting mat with the Wedge Star Tool on top, as shown in the diagram below. Align the small mark near the tip of the tool with the top of the strip and the proper size line on the tool at the bottom edge of the strip (this is where my strips being larger caused me a bit of stress - if you trimmed them, it should like line up perfect with the size).
 |
| Right Handed |
 |
| Right Handed |
 |
| Rotate the Wedge Star™ tool 180° so the sharp point is closest to you. |
 |
| Repeat until you have enough Large Wedges for all the strips |
1. Align the small mark near the tip of the tool with the bottom of the strip and the proper size line on the tool at the top edge of the strip. Cut
up one side of the tool and down the other. Left handed quilters will work from right to
left.
 |
| Left Handed |
 |
| Left Handed |
 |
| Rotate the Wedge Star™ tool 180° so the sharp point is fartest from you. |
 |
| Repeat until you have enough Large Wedges for all the strips |
Make sure you cut the proper quantity of Large Wedge, per strip, according to the download.


Tip: Start with a leader scrap first, to ensure the point doesn’t get pulled into your machine. Also, consider using a straight stitch plate on your machine.


You will do this by positioning a Wedge Pair on a cutting mat. Align the common diagonal on your Tucker Trimmer® with the seam to trim the “dog ears” and true up the 90° angle.
Note: There may be just a few “whiskers” trimmed here. Trim all Wedge Pairs.
Right Handed
If you are Right Handed you will orient the pair, so the 90° corner is in the upper right.


If you are Left Handed you will position the pair, so the 90° corner is in the upper left.


Make sure to share your completed clues in the Ticker Tape Parade Facebook Group (to join, make sure to answer the questions - if you do not, you will be automatically denied).
Woohoo! Well that is it for today!
Yesterday, I drove up to Vermont and I'm teaching my Fall Retreat at Quilting in Vermont (The Strong House Inn, Vergennes, VT) through Sunday. So, I better get down to breakfast. Make sure to follow me on Facebook to keep up with our progress.
Next week, I will be in NJ, teaching a Stay in your Bed Retreat at Pennington Quilt Works, in Pennington, NJ. Call Pennington Quilt Works if you would like to join us!
Keep Stitching and Stay Warm!
Michelle


Comments
Post a Comment