Sweet 16! Another great Lemoyne Star! Blazing Lemoyne is Clue #16 and this one looks spectacular when finished!
How Tada are these blocks?? Love them.

Before I jump into the block, I wanted to thank you for all the well wishes. I'm two days post total knee replacement surgery. I'm doing well, trying to follow doctor's orders. LOL. It is my right knee, so I'm hoping sewing can be part of my PT soon. Aside from this section, all of this was prepped ahead. I think you will love this block. I have two more great blocks planned and then the finishing setting. We are getting close and I know I'm excited for you to see this finish. Sorry, this is running so close the holidays, next year's Medallion series shouldn't be as close. I usually like them to finish by November. Hopefully the fabric supply chain will cooperate. Believe it or not, I've already started designing next year's medallion quilt and I've picked out my fabric selections.
Back to this block, it can be a challenge, but you've mastered the skills over the last 15 weeks, I've taken you from basic Lemoyne and Wedge techniques, and gradually built on techniques. So, I think you have this. If you have the Class Membership, I've take you step by step and give you through all my tips. Plus, I have tons of photos below for those with the Clue only.
Fabric Selection
For fabric selection, you will want to stay with fabrics that read more tone on tone if you can. But note that I've pulled off a great block using Kaffe, so it is doable to use fabric will some more interest.
 |
| For my Starflower Christmas I went with an analogous color plan, very calming |
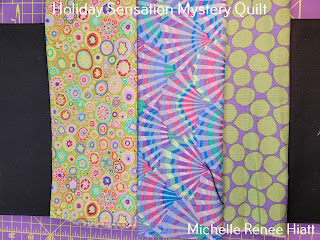 |
For my Kaffe selection, I went with a split complementary color plan which will help balance this block.
|
Cutting and Organization
Take your time and cut your strips properly. Cutting matters, organization matters, your 1/4" seam matters, and pressing matters. Follow all of those careful and you will be good to go.
While doing your cutting, go ahead and cut those background squares 1/4" off center.
Constructions tips
Let's talk through the construction of the Blazing Lemoyne Units. Take your time and pay attention to the tips provided.
Lay out your strips properly and mark.
See it, flip it, stitch it.
Press it - Carefully. Press these open so make sure to use the big seam stick.
For those that are right handed, when prepping for your sub cuts, make sure to have BOTH strips right side down. Both strips!
For those that are left handed, to prep for your sub cuts, make sure both strips are right sides up.
Once you have the cut, you want to lay them out. Take you time and ensure you have them oriented properly.
Mark the quarter inch, on the seam, on the side you will be sewing together.
Then precision pin using that mark and your best pins.
It will take a good amount of time, but well worth it. Stitch them carefully.
Make sure to mark your invisigripped Lemoyne Star, using the measurement in the Clue.
Once marked you are ready for your units, which you will have wanted to pressed that last seam open.
Next, it is time to trim the Blazing Lemoyne units. Make sure to trim the proper side with the just marked lines.
 |
| Right Handed |
 |
| Left Handed |
Next, it is time to make the Triangles.
Focus on the A unit first. Sew the Large Triangle first.
Once you press it toward the Large Triangle, you will need to trim that dog ear.
Then stitch on the Small Triangle.
Press toward the Small Triangle.
Next, stitch the B unit, which is the mirror image. Stitch on the Large Triangle.
Press toward the Lemoyne star.
You need to trim the dog ear, and I recommend using a ruler and rotary for this trim.
Nice and straight.
Then, stitch on the small triangle.
Stitch toward the small triangle.
Next, we need to trim them to the proper size. Make sure to check all the measurements.
 |
| Right Handed |
 |
| Left Handed |
Next, it is time to put our Triangles together into Quarters.
Take you time to pin. Pinning will really make a difference. Sew with your best 1/4" seam.
Before putting these together into Halves, make sure to give those dog ears a trim. This should be dog ears, and maybe a few threads.
Then stitch your quarters into halves.
Make sure to pin, plus sew with your best 1/4" seam. It does matter.
Double check your block layout to make sure all your seams look good at this point.
Then precision pin to get the best block center!
Stitch with your best 1/4" and give it a good press.
Next, the final trim down!
 |
| Right Handed -1st trim |
 |
| Left Handed - 1st trim |
 |
| Right Handed -2nd trim |
 |
| Left handed - 2nd trim |
TADA!!!!
Only 2 Clues left. I'd love to hear what you think of this Block. i can't wait to see your blocks!
Keep stitching,
 While doing your cutting, go ahead and cut those background squares 1/4" off center.
 Lay out your strips properly and mark.
 See it, flip it, stitch it.
 Press it - Carefully. Press these open so make sure to use the big seam stick.
  For those that are right handed, when prepping for your sub cuts, make sure to have BOTH strips right side down. Both strips!
 For those that are left handed, to prep for your sub cuts, make sure both strips are right sides up.
 Once you have the cut, you want to lay them out. Take you time and ensure you have them oriented properly.
  Mark the quarter inch, on the seam, on the side you will be sewing together.


 Then precision pin using that mark and your best pins.
 It will take a good amount of time, but well worth it. Stitch them carefully.
  Make sure to mark your invisigripped Lemoyne Star, using the measurement in the Clue.
 Next, it is time to trim the Blazing Lemoyne units. Make sure to trim the proper side with the just marked lines.
  Focus on the A unit first. Sew the Large Triangle first.
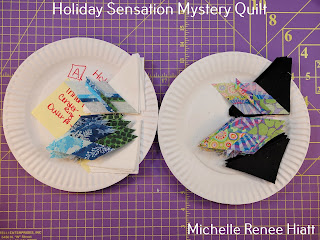 Once you press it toward the Large Triangle, you will need to trim that dog ear.
  Then stitch on the Small Triangle.
 Press toward the Small Triangle.
 Press toward the Lemoyne star.
 You need to trim the dog ear, and I recommend using a ruler and rotary for this trim.
  Nice and straight.
  Then, stitch on the small triangle.
  Stitch toward the small triangle.
  Next, we need to trim them to the proper size. Make sure to check all the measurements.
  Take you time to pin. Pinning will really make a difference. Sew with your best 1/4" seam.
  Before putting these together into Halves, make sure to give those dog ears a trim. This should be dog ears, and maybe a few threads.
  Then stitch your quarters into halves.
 Make sure to pin, plus sew with your best 1/4" seam. It does matter.
 Double check your block layout to make sure all your seams look good at this point.
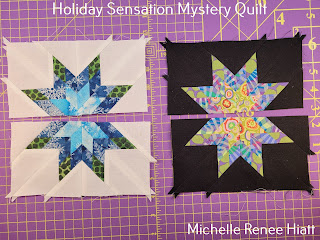 Then precision pin to get the best block center!
 Stitch with your best 1/4" and give it a good press.
  Next, the final trim down!


Comments
Post a Comment