Ticker Tape Parade Revealed!
Yeah! The time has come to reveal Ticker Tape Parade! I hope you all love it as much as I do! More than anything, I hope you enjoyed the process and learned a Jelly Roll quilt doesn't need to just be a strip quilt!


Okay, a little tricky, a partial seam, but stick with me and this will be easy.


I hope you can see the symbolism of the Ticker Tape flying through the air, along with the Confetti. The Parade barriers, street blocks, and the crowd on the fringe. I know I'm a bit crazy, I see quilt designs wherever I look.
Best of all, I love that I was able to do all of these units with a Jelly Roll.

I hope you all enjoyed the Mystery and love the quilt. Bella, is waiting for me to quilt it!

On New Year's Eve, I gave an advance partial Clue #8AP. Make sure you download Clue #8AP, if you haven't already. Plus, you will want to download today's Clue #8Final. Both will be available through next Friday, January 10th. You will need both Clues!
Tips - Please read
Details are in the download, but there are a few things I want to cover in tips, that I hope you will read. The construction of the Quilt Center is fairly easy, but you will want to have a perfect 1/4" Seam, as this quilt has four pieced Borders.
- Test your 1/4" seam and measure it to be sure that you have a good 1/4" seam. Your 1/4" seam is going to make or break you in the construction of the quilt.
- It's time to get out the Seam Stick (I love my 32" Seam Stick for pressing my quilt row seams open.
 |
| Use your seam stick for pressing the Rows open |
- You may want to measure your quilt center to ensure you have good 1/4" seams before adding your first Border. Normally, I say measure your quilt in 3 places and take the average to determine the length of your Borders. However, there is much math involved in getting these pieced Borders to work, that you will need your quilt center to 42 1/2" Square.
- If it is larger, you will want to check your seams, they may be too scant.
- If the quilt is smaller, your 1/4" is too large.

- I like to fold my quilt to a manageable section and then roll it, so it can sit on may lap as I sew. This quilt is small, but has a lot of small pieces and thread in it, so it is a little heavy. Plus, you have exposed open seams, so be careful.
 |
| Support your Quilt |
- I double pin my open seams to ensure the weight of the quilt doesn't unravel them. Consider pinning like a lefty (we are good people-lol). Pin from the left hand side, allows you to keep those pins in, just until you get to your needle.

- You don't have to be able to pull them all the way out, if you use the Quilter's Fine 1 3/4" Pins. You can just use your thumb to move them back a bit.

- Then pull them out after they are behind the foot. You could do this with your right hand if you needed to, going through the throat of your machine. I think you will find that your results will be much better.

- I layed out my Diamond Rects to create (4) different borders. You don't have to, but I knew I wanted to...

- Now, only you know how well your Diamond Rects turned out, if they were perfect when you trimmed them down, you might be able to skip precision pinning and piecing. I'd rather pin than rip later, so I pin. I've included photos below, you could also check out my video on precision piecing that I did for AQS: AQS Michelle Hiatt Precision Pinning and Piecing
- Put the pin through the seam cross at the Diamond point.

- Then take the pin and put it through the other Diamond's point.

- Put the pin half way through.

- Hold the pin over the edge so that you can keep the pin perfectly straight.
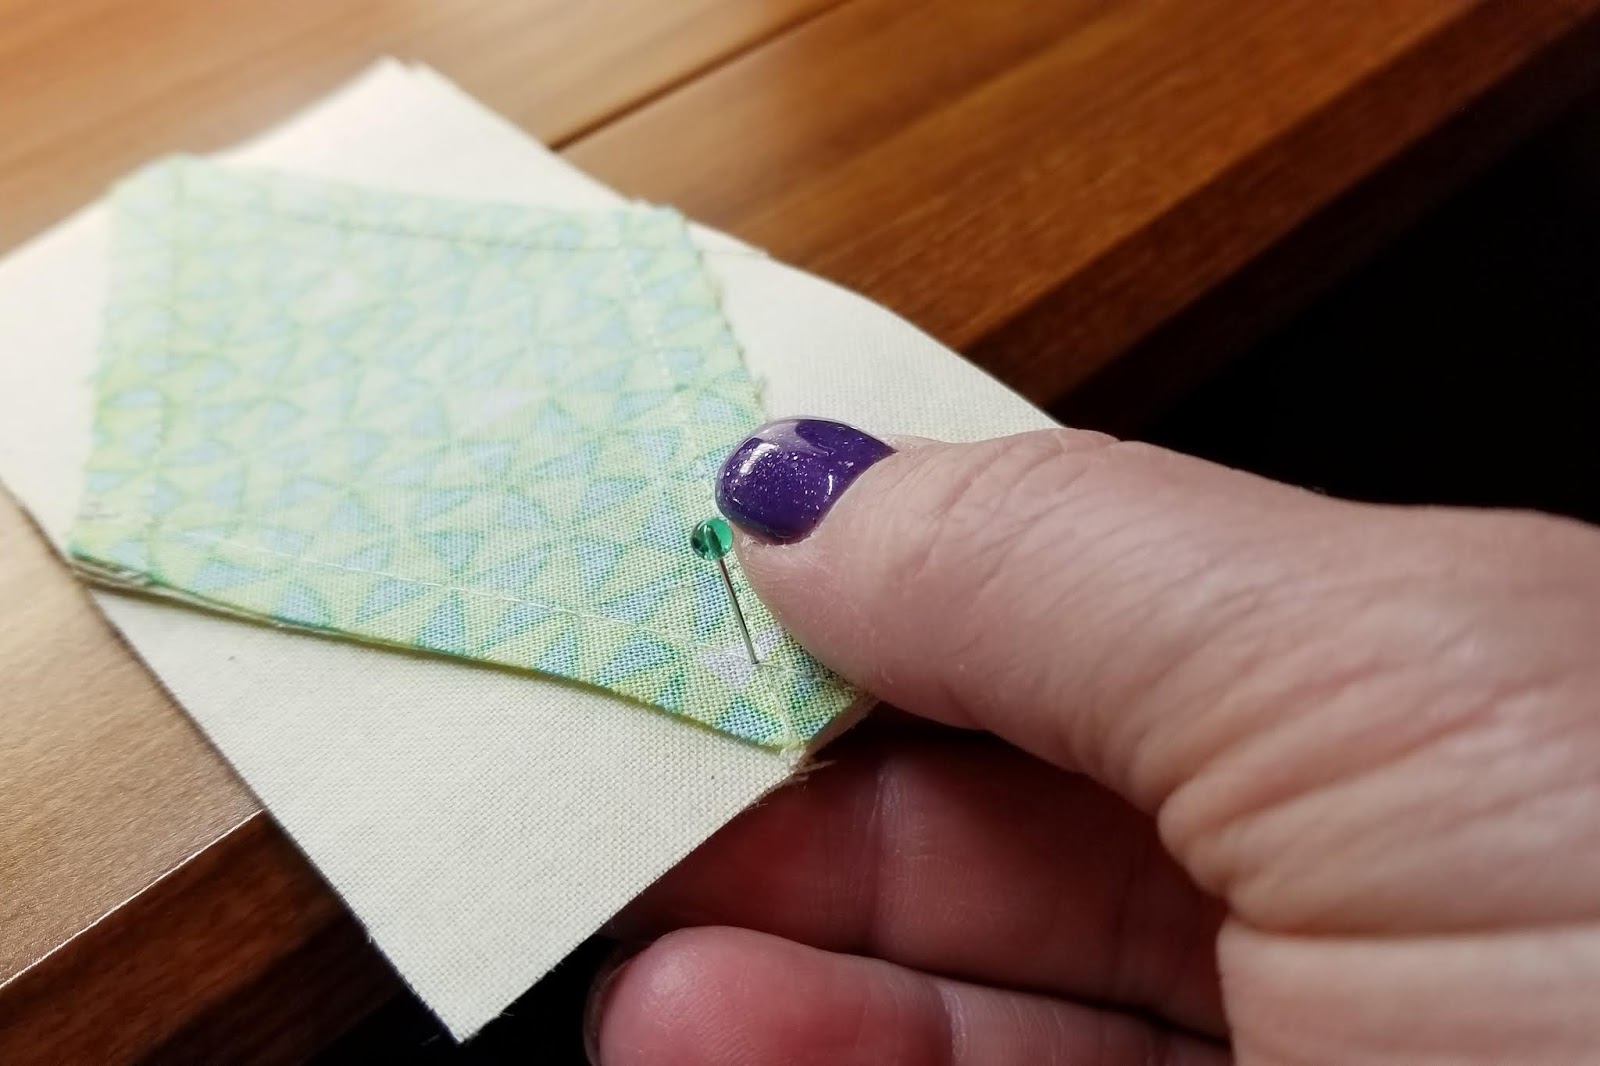
- Then put pins on both side of the straight pin.

- Pull the straight pin out.

- Then stitch. Again, use the Quilter's Fine 1 3/4" Pins will help and pinning from the left side, allows you to keep those pins in until the very last moment.

- Press the Diamond Rects Border open. Using the Seam Stick will help give you nice flat seams.

- I made both my Diamond Rect Border and Piano Key Borders, and auditioned them with the quilt center. There is a Background Border that goes between them, but I just wanted to make sure I was going to like how they would look.

- When putting on the Background Border, I fold it in half and line that up with the center of my middle Diamond (Center of the Diamond Border) to ensure, that I will pin the Background Border evenly.

- I fold the Border over, and pin, right sides together.

- Then I pin one side, ensuring the Border is even.

- Then I pin the other side, again making sure it is even.

- Stitch, press and tada! Perfect.

- The first of the Piano Key Borders, it is going to hang over one Piano Unit on the left side. So I start there and pin the rest of my strip.

- It is pinned, to ensure that it will fit perfect when I get the fourth Border on.

- Next, I'm going to triple pin, 2 Piano Key units in (one Piano Key from the actual edge of the quilt top- remember 1 Piano Key is hanging over).

- Next I will unpin the unit that is hanging over, so that my Triple pin is the last pinned section on the left.

- I'm going to turn the quilt so that I can stitch it, and I start at the partial seam (triple pin), this way, there is no way I'm going to "blow" through it in my sewing haze (LOL).

- I put my needle down and remove my triple pins before sewing. I also lock in this stitch by taking a few stitches forward, back and forward.

- Stitch to the end, and you will have 2 Piano Keys hanging off. This is exactly as it should be.

- Then pin it back so it doesn't get caught anywhere.

- Stitch your 2nd, 3rd and 4th Border on as normal. Be careful on the 4th to ensure you have that "hanging Piano Key unit" pinned out of the way.

- Stitch and press that 4th Piano Key border. Unpin that 1st Piano Key Border.

- Lay it flat.

- I like to press it flat, right sides together, including the first few inches that I sewed previously.

- Stitch and TADA! Perfect!

I hope you can see the symbolism of the Ticker Tape flying through the air, along with the Confetti. The Parade barriers, street blocks, and the crowd on the fringe. I know I'm a bit crazy, I see quilt designs wherever I look.
Best of all, I love that I was able to do all of these units with a Jelly Roll.

 |
| Bella Loves it but wants to know why it isn't quilted --- :) |
I may add a skinny background Border to float the Piano Key Border. If you were mistake free, you should have enough to cut (6) 1 1/2" Background Strips and do the same. Plus, you could always add a Traditional Border. I'd go with 4-6" finished, if you want one. If you go with it as designed, be sure to put a stay stitch in all around the border, with a 1/8" seam.
I hope you will be joining my next Mystery Series, Grand Central, it starts in 2 weeks. Get details at: GC Fabric Requirements. I will be blogging a few more fabric selection tips over the next two weeks. Be sure to tune in!
That's it for today. I have sewing and family visiting this week. Plus, I'm kicking off an new tester group for my Dogwood Lane pattern... can't wait!
Keep stitching,
Michelle


I love this quilt. Thanks Michelle for taking the time to design it and share it with all of us. Looking forward to Grand Central to start.
ReplyDelete