Grand Central Mystery Quilt Series- All Aboard - Clue #1
Are you ready! It is time to jump aboard the Grand Central Mystery Quilt Series!


Lastly, you will cut them in half on the diagonal into Half Square Triangles.
 Then, I pull the one ruler away.
 And cut! Leaving a perfect strip.
 Then, make sure to assign the proper width strip to the proper placement. I do this with my favorite paper plates.


When sewing, I like to bring my stitch length down,to 2.0
 Gather you Strips #1 and #2...

I like to go through and match my fabrics up first, to make sure I'm happy with all partners. I usually line up the one pile (Strip #1) and then got through and find a partner in the other pile (Strip #2).

When I'm happy, I move the pair to the left, and keep going to I'm happy with all of them.

When sewing strips, I notice that students get a little lazy sometimes and fail to keep a good 1/4". This step will require, you have a good 1/4" throughout the strip set.
 So, pay attention until the end.
 I like to chain piece my strips.
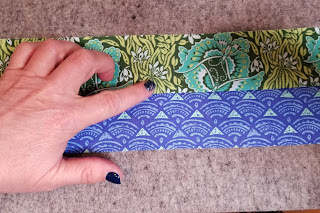
 For pressing, remember it is very easy to make your strips "wonky" with a hot iron. You will need to set your seam first. Which just means heating it so the thread drops into the fabric and locks.
 Then, finger press, keeping the strip straight. Do not push the fabric over with the iron. You will distorted your strip.
 Then press.
 Check to make sure that you have no "lips" in you fabric, that the seam is press to the stitching line.
When adding Strip #3, I went through and had another matching party.
 Tada! I'm ready to sew.
 Again, keep a good quarter inch.
 Press well. Set the seam.
 Finger press.
 Press.
 Both Strip #1 and Strip #3 should be pressed toward Strip #2.
 Okay. Now, you are going to take your Wedge Star and place it on your Strip set. You want to take the time to line up the bottom of your strip set with the proper size on the Wedge Star.
Next, check to make sure the top of your Wedge Star lines up with the little line on the top of the tool.
 Right handers, start on the left side of the strips set and cut both sides. See additional tips in the download.
 Right handers, rotate the Wedge Star 180 degrees, and line back up.


Left handers,handers, rotate the Wedge Star 180 degrees, and line back up.

Both right and left handed quilter, keep rotating and cutting to end of the strip set.
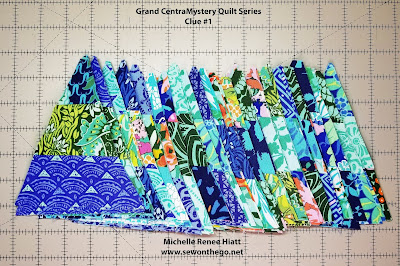
 Repeat for all the strip sets until you have enough. You should get 7 Strip Wedges out of each Strip Set. If your strip sets aren't 20 1/2" long, and you only get 6 out of each strip set, you may need to make another strip set.
 How fabulous! Wait to you see what we do with these!
Make sure to share your Strip Large Wedges in the New Grand Central Facebook group!
Well, that is it for today, make sure you go back through early Blog post if you want additional information on fabric requirements or help picking out fabric.
I have a retreat to finish setting up for.... Cabin Fever here I come! Next year's Cabin Fever retreat will open for enrollment next week.
Keep stitching,
Michelle
Today, I'm releasing Clue #1!
I have to tell you, all week and especially as I'm loading the car to head over to set up my Cabin Fever Retreat, that starts today, in Southbury, CT... I've been thinking I must be crazy kicking this off today, but oh well, I can be Wonder Woman today.
So, if this is your first Quilt Mystery with me, here is what you need to know:
- Each week I announce my Clues in my newsletter, so make sure you are subscribing to my newsletter (https://sewonthego.net/newsletters) and add my email to your contact list so it doesn't end up in your spam or junk file.
- A link in the newsletter will tak you here to my Blog, where I will give pictorials, each week there is a new technique, plus tips and tricks.
- In the overview/pictorial in this Blog, you will see that the exact measurements, cuts, etc will be in the download. You will need to look for the word "download" in the Clue's narrative.
- After you read all my great tips (please read it will really help you), click on the word "download" in the Clue's narrative, it will take you to my Retreat page on my website, page down to the Grand Central Mystery Quilt Section, and click on the Download for this week.
- Note: You can also find the fabric requirements there. Page back through the last few weeks Blog post to get help on picking out your fabric.
Okay, now you are ready!
Clue #1 - Only available to Thursday, January 23rd.
Below, I've provide a pictorial on both units for today's Clue. Plus tons of great sewing tips. You will be making Strip Large Wedges and cutting Half Square Triangles. We will use the Wedge Star Ruler to make the Strip Large Wedges. Plus, if you have the Tucker Trimmer II it will come in handy in cutting the Half Square Triangles.


However, first we must start with preparing your Assorted Brights for the Mystery.
- The entire pattern will call for HWOF (Half Width of Fabric) of your Assorted Bright Fabric.

- Therefore, cut each of your Assorted Bright fabrics, at the fold across the yardage.

 |
| Cut along fold |
 |
| You will now have (2) HWOF sets of Fabric |
- For example, when you get a Fat Quarter, they cut a half yard of fabric on the fold, when folded selvage to selvage, to create (2) Fat Quarters that are both HWOF. It will make the fabric from selvage to former fold be about 20 ½”-21”.
- Note: If you are using Fat Quarter, this is already performed for you.


Now you are ready. Remember the pictorial below will help you and provide tips to help you improve your sewing. The details will be in the Download. We will be using
Let's skip the cutting for the Strip Large Wedges for a second. Let's look the cutting for Half Square Triangle, for Group 5.
Your Squares for you Group 5 Half Square Triangles, end in a 1/4". Whenever I need to sub cut Squares into a size that ends in 1/4" or 3/4", I always use my Tucker Trimmer II. I cut the long width of fabric strips with my normal long ruler.
Then I use the Tucker Trimmer II to subcut the squares.
Your Squares for you Group 5 Half Square Triangles, end in a 1/4". Whenever I need to sub cut Squares into a size that ends in 1/4" or 3/4", I always use my Tucker Trimmer II. I cut the long width of fabric strips with my normal long ruler.
Then I use the Tucker Trimmer II to subcut the squares.
 |
| Left handed |
 |
| Tada! |
 |
| Right Handed |
 |
| Tada! |
 |
| Sub cut them on the diagonal and you are finished. Label and set aside. |
Now, let's go back to the assorted Brights. You should have all HWOF Fabric. You are going to want organize your fabric, and ideally use all of your Assorted Bright fabrics for Strips #1, #2, #3. I'm making the queen, so I have 22 Assorted Brights, so I cut a strip from each of them for my Strips #1 and #3, which are the same width. Strip #2 is a little wider, and therefore I went back through an cut a strip from 11 of my 22, equally from my color choices.


When cutting long thin strips, I double ruler, place my small strip over the clean cut, lining up the measurement. Then I place my long ruler next to it, lining it up, and ensuring that both rulers are straight.


When sewing, I like to bring my stitch length down,to 2.0


I like to go through and match my fabrics up first, to make sure I'm happy with all partners. I usually line up the one pile (Strip #1) and then got through and find a partner in the other pile (Strip #2).


When adding Strip #3, I went through and had another matching party.


 |
| See the arrow |


Left hander, start on the right side of the strip set.

Cut both sides. See additional tips in the download.


Make sure to share your Strip Large Wedges in the New Grand Central Facebook group!
Well, that is it for today, make sure you go back through early Blog post if you want additional information on fabric requirements or help picking out fabric.
I have a retreat to finish setting up for.... Cabin Fever here I come! Next year's Cabin Fever retreat will open for enrollment next week.
Keep stitching,
Michelle


“Tada!” I love it! Michelle, as usual your instructions are very thorough. Thank you for your attention to detail and giving us tips along the way. Janet N.
ReplyDeleteI am having a little trouble.with the download link in this post.... do I have to grab it from your email, or should it work from the blogpost?
ReplyDeleteIt works from the blog post, which directs you to my sewonthego.net Retrewt page. Where you page down to the Grand Central section and see the downloads.
Delete