Block 43, Lemon Star, by Ruth Finley, was published in Old Patchwork Quilts and the
Women Who Made Them, in 1929. This block is made up of a traditional
Lemoyne Star and framed with border and cornerstones.
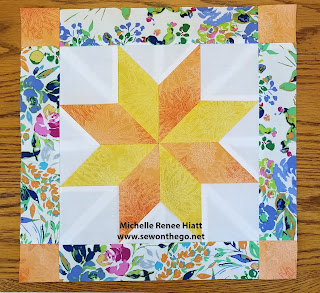 |
| Block 43 ~ Lemon Star ~ Michelle's Fabric Selection 1 |
This block was later published as Diamond Cluster in a Frame, in the Kansas City Star, on March 21, 1956. What is funny, is that the 1956 clipping included a Lemoyne Cookie recipe. I wonder if an editor changed the name of the block at the last minute, or if the Lemon Cookie recipe was a coincidence.
Stephen and I have a tradition of making
Lemon Cookies every Christmas, with fresh lemons from our Lemon Tree, we give them to those who provide a service to us all year through, and they are fabulous! I know this, as my mailman starts lingering around December 1st and each week after that (he deserves a few batches). The lemons are coming in now, so I know it is time to start baking and I thought it fitting to make the Lemon Star block, the first Lemoyne Star pattern to be featured, especially at this time of year.
Since I teased you with talk of my
Glazed Lemon Cookies, I will share my favorite recipe, which is a Martha Stewart recipe! I've pinned it in Pinterest, be sure to check it out:
Recipe
So, back to the block, we have a new technique and tool-to-the-series! Which means I've provided a step-by-step pictorial below, in addition to the fabulous directions in the download! As bonus, new tools, new sale....
Sale running today through next Thursday, December 5th, with Coupon Code
LEMON20 get 20% off the
Rapid Fire Lemoyne Star and
Tucker Trimmer III, plus any
Lemoyne Pattern or Tech Sheet!
Okay, lets talk color! I added a few additional photos this week, to help those looking for additional direction using the
3-in-1-Color Tool. I know several of you are starting to pull your fabrics for the upcoming Mystery Series! Remember you can details on the Mystery on my Blog post for Block 40:
Mystery Detail Post.
For my first fabric selection, I went with a Split-Complementary Plan. I wanted to include Golden Yellow (24) since the block is called Lemon Star. So I started on that tab, turned it over and found the Split-Complementary section, found the tab numbers and pulled those out. Then, took that to my fabric container (I'm down to a lot of scraps!).
 |
| 3-in-1 Color Tool |
I found a fabulous Orange-Yellow (23) and Print that reads Blue-Violet (12).
 |
| Michelle's First Fabric Selection |
For my second fabric selection, I went with a Triadic color plan. Again, going with the Golden Yellow (24), I flipped the tab over and found the Triadic section.
 |
| 3-in-1 Color Tool |
I went to my stash and pulled out an Aqua Blue (8) and a Fushia (16).
 |
| Michelle's Fabric Selection 2 |
If you are looking for more help on color, I'm putting together a Color Workshop at the Yankee Quilter in Seymour, CT. Stay tuned for details!
Let's talk technique! I love the Lemoyne Star, it is one of my favorites! I typically write a new Lemoyne pattern every 3-4 patterns. I actually have two new Lemoyne Patterns coming soon (check out my
retreat page to see them).
This block really comes together easily with the
Rapid Fire Lemoyne Star and
Tucker Trimmer III! Stripped pieced, no "Y" seams! Totally worth the purchase, if you don't own it. The remaining blocks will all feature Lemoyne Stars, plus you can make so many different types of Lemoynes with the 1 ruler!
I've provided detailed measurements and numbers in the
download, that is available through Thursday, December 5th, however below I've detail additional tips plus pictures!
Let's get started!
1.
Gather medium and dark strips, these will be your Diamond Star Strips and the Background Strips.
2.
Pair the medium and dark diamond strips with the Background strips to make strip sets. Place two background strips right sides up, laying side by side, see photo below. You can mark these as stated on the Tool instruction and the download, however, I typically fold it at a 45 degree angle, creating a "house" and place the strips inside the "house.
3.
For the shading as presented, position the medium star strip as the “A” diamond strip, on the right side on the Background strip and, the width of background strip from the top of the Background (right sides together and stagger as shown above). Position the dark star strip, as the “B diamond strip. Stitch the strips using a ¼” seam. I chain stitch these going from end to end.
4.
Press A Strip Set towards the Background Fabric and Press the B Strip Set towards the Diamond Fabric.
 |
| Press A to the Background Strip |
 |
| "B" a star - Press B to the Diamond Star Strip |
5.
Layer A strip right sides together with corresponding B strip, background strip to background strip and star strip to star strip to prepare for the “first cuts”. The long seams should "nest". Note that if you are right handed, you will want to place the "A" strip on top and place the end marked "tops" on the left hand side of your cutting mat. If you are left handed place the "B" strip on top and the end marked "tops" on the right hand side of your cutting mat. See diagram below. In both cases the star strip should be closest to your body and the background strip furthest away. Proper positioning here will allow you to easily cut the 45° angled slices.
 |
| If you are Right Handed, the Strip Strips create a right tail. If you are Left Handed, this is reversed |
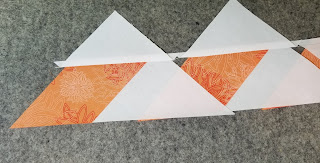
6.
Set the 45-degree angle using the Rapid Fire Lemoyne Star™ tool (RFLS). Right handers cut from lower right to upper left. Left handers cut from lower left to upper right. The illustration shows its placement. By lining up the ruler edge with the stitching line as shown and bumping another cutting ruler up against the angled edge. Pull the RFLS away and cut. See diagram.
7.
Continue making 1st Cuts — 45-degree angle cuts the width of your star strip across the length of the strips, checking your angle with the RFLS Ruler, until you have a total of (4) pairs, keep your pairs of pieced units together.
 |
| Every few, I check the angle - Okay, I'm pretty "A", I check it almost all the time :) |
 |
| Keep this on the mat - TRUST ME |
8.
Make your second cuts, on each pair of pieced units, going vertically south to north, 90-degrees from the seam joining the diamond strip to the background, positioning the ruler edge at the tip of the star strip and trim straight. Creating pieced units and cut-offs (you need both).
 |
| Line up a straight line of your ruler, on the top edge and move the ruler over until it "kisses" the tip of the strip |
 |
| The Ruler should be right up against it, but DO NOT CUT the Tip. |
9.
Layout and piece, open the pieced units so they are laying right side up, and position the cut offs right side up as shown in the photo below, and stitch cut pieces together into pieced triangle units.
Tip: Layout the units on a paper plate, so that you can “see it” to ensure it matches the photo, then “flip it” to prepare for sewing (pin if needed), and “sew it” with your best ¼” seam.
 |
| Always sew with the Diamond on the top - oversized triangle on the bottom |
 |
| Diamond on Top |
10.
Press carefully, pressing the seams - “A” pieces will be pressed toward the star point fabric, “B” pieces will be pressed toward the background fabric. STOP - DO NOT sew into quarter blocks yet!
11.
Trim down all pieced triangle units, using the RFLS™ tool, to trim to the exact size. Place the unit right side up on the mat. Point the diamond toward a 2 o’clock position if you will be trimming right handed or toward a 10 o’clock position if you will be trimming left handed. See photos. Align the desired block size lines with the sewn seam lines. Trim along both sides of the ruler. Repeat for all units. (Ignore my blue lines - - you will find out soon enough what they are for).😊
Right Handed
 |
| Right Handed - 2 o'clock |
 |
| Yeah! |
Left Handed
 |
| Left Handed ~ 10pm |
 |
| Yeah! |
12.
Position, you will now have pieced half square triangles that will fit together perfectly in the center and have all seams nesting. For the traditional star you will stitch along the diagonal to create a square.
 |
| Pin! You will pin now or rip later |
 |
| Don't put the Diamond point in first, it may get sucked into your machine |
13.
Stitch the pieced triangle units together, first into pairs, I prefer to stitch from outer star inward to the center, so that little point doesn’t get sucked into your machine. Use your best ¼" seams! Focus on aligning the star centers and all pieced seams. See diagram. Press seam open, use the
Pressing Stick, there will be less bulk and the seams will match up better in the center. Trim the “Dog Ears”.
 |
| Press on the Pressing Stick |
 |
| Trim the dog ears! |
14.
Then stitch into half blocks and then into the complete block, pressing seams opens, make sure to trim the “Dog Ears” as you go, as you want the least amount of bulk in that star center.
 |
| Pin and Stitch |
 |
| Press |
 |
| Pin and Stitch |
 |
| Press |
 |
| How Tada! Check out how flat! Pressing Stick and Wool Mat help! |
15.
Trim to Size, once the block is complete, trim to proper size. Use the Tucker Trimmer III, if a half inch measurement, place the half circle corner the upper right corner, if you are right handed or place the half circle corner in the upper left corner if you are left handed. Simply align the desired size diagonal cross hairs of the ruler with the diagonal seam lines of the pieced block and trim.
16.
Rotate the block and repeat for other two sides. ¬The block is immediately centered, and all edges will have the correct ¼" seams.
Tada!
You are going to love it!
Well, I have to get back to my crazy day! I hope you enjoy this week's block. Don't forget to share your completed blocks on the
Facebook page. Also, remember the
sale!
Be sure to check out my events and be sure to "follow me" so you you get the jump on upcoming events!
Facebook Events.
Keep Stitching,
Michelle


 Tip: Layout the units on a paper plate, so that you can “see it” to ensure it matches the photo, then “flip it” to prepare for sewing (pin if needed), and “sew it” with your best ¼” seam.
 11. Trim down all pieced triangle units, using the RFLS™ tool, to trim to the exact size. Place the unit right side up on the mat. Point the diamond toward a 2 o’clock position if you will be trimming right handed or toward a 10 o’clock position if you will be trimming left handed. See photos. Align the desired block size lines with the sewn seam lines. Trim along both sides of the ruler. Repeat for all units. (Ignore my blue lines - - you will find out soon enough what they are for).😊


 Tada!
Tada!


Comments
Post a Comment