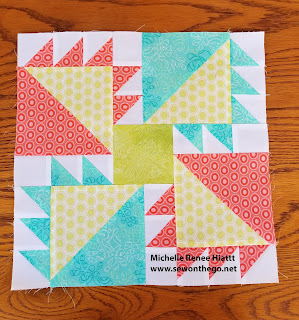
Week 11 and it is time to catch up! Special treat - Block 1 is available again for a limited time!
Can you believe that we completed 10 blocks! I built in a few catch up weeks into the Timeless with a Twist program (4 to be exact) and this is one of them. As a bonus, I'm making Block 1, the Bear's Paw, available again, since we had so many people join late.
So, if you are running behind, you have a week to catch up! If you missed block 1, you can make it now! I've heard that several of you want to re-make your block 1, so this is the perfect week to do so!
For those of you that are caught and have block 1 completed. I would like to remind you about the color placement. I noticed that a few folks laid out the their "paws" different than the pattern. So, pull out that first block and check to make sure you have your paws are coming together properly. Page down for some tips and tricks on putting the paws together, the partial seam and some reminders about scrap management.
 |
| Block 1 - Michelle's Fabric Selection 1 |
Next, pull out those color wheels when pulling your fabric. You will find, for my Scrappy Art Gallery version, that I went with a Triadic approach, selecting Orange-Red (20), Spring Green (4) and Blue-Violet (12). Love it!
 |
| Block 1- Michelle's Fabric Selection 2 |
A few reminders on managing those scraps left over when you are going block by block:
When cutting your fabric for this block, go ahead and cut full strips of your fabric, whether it be background or your fat quarters. Don’t make swiss cheese of your fabric. Go ahead and cut those 5 ½” strips. Just save the rest of the strip, I guarantee in an upcoming block, you will use some or all that strip. When working on a Sampler Quilt I end up with 3 sections of my storage box. (1) Uncut, still in tack FQ or yardage. (2) Scrap bag for the rest of any strip I cut. (3) Remainder Bag for the balance of the Fat Quarters, anything wider than 8” I will stack and keep together in the Remainder Bag. Down the road, once I pick the fabric I want to use, I go back to the Scrap Bag and Remainder bag, to see if anything already cut will work.
 |
| Cut Strips not Swiss Cheese :) |
 |
| Remainder Stack that I will place in a bag |
 |
| Scrap Bag |
Let's talk about PRESSING!
I've noticed that a few of you may be struggling with your pressing. As many of you have heard me in class, take the time to press properly. It can make or break your units.
Make sure you are using a great pressing surface, a good iron and that you are setting your seams, finger pressing and pressing. Don't be afraid to use some steam or Best Press to get your best seams. Plus, get out (or purchase) a seam stick!
Make sure you are using a great pressing surface, a good iron and that you are setting your seams, finger pressing and pressing. Don't be afraid to use some steam or Best Press to get your best seams. Plus, get out (or purchase) a seam stick!
On many of the blocks, I recommend that you press some of the seams open. Which is easy, simple as 1,2,3! (1) Set in the seam with your iron. (2) Place the sewn unit over the stick and finger press the seam open (I do this while it is slight warm). (3) Take the unit off the stick, turn it over and press! Your seams will be so flat, you will be amazed.
 |
| After Setting Seam - place over stick |
I happen to love the wooden Seam Sticks, I use an iron with steam and the wooden stick will wick the steam right through providing an awesome press!
 |
| Finger Press and then press with Iron on stick |
 |
| Look how fabulous! Flat seams! |
Be careful! Once you get your units made and you are creating the “paw”, they go together as partial paws, so make sure you refer to the diagrams. This step is where many mistakenly match the paw fabrics, when you are actually suppose to put two of the alternative color on the bottom.

Next, you will need to sew a partial seam. I walk you through it step-by-step in the instructions. However, my most important tip is to make sure your lay out your block before you start sewing.
 |
| Layout the partial paws |
 |
| Stitch a partial Seam |
 |
| Press away from the Center |
Then, remember you need to do a partial seam and work counter clockwise.
As always, remember you can post your completed blocks to the Facebook group. It is a great group! The members have been sharing their completed blocks, their fabric selections, they ask questions, etc. Request to join now! Just click here.
This week, I'd love to see more of your design boards, with all 10 blocks!
This week, I'd love to see more of your design boards, with all 10 blocks!
Ok, get stitching! Download the cutting instructions and block construction here, until Thursday, March 22nd.
Have fun and here is to hoping that Spring arrives in New England!
Keep Stitching,
Keep Stitching,
Michelle


Comments
Post a Comment