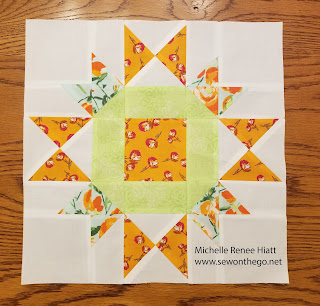
Rising Sun! Block 7!
Woohoo! Block 7 is Rising Sun,
published by Nancy Page in the Birmingham
News, May 13, 1941.
 |
| Block 7 - Rising Sun |
I've searched several different reference
materials, but I was unable to find another block that was similar. I did give some thought to not including Rising
Sun, but I loved it and I wanted to show the uniqueness of the block. It really is striking with the
Pickets/Quickets creating those tulips (my term) between the two-toned Quarter Square
Triangles.
We have a new technique in this week's block, it is those Pickets/Quickets, we are going to make them using our Wing Clipper! It is a fabulous technique, you will love the accuracy!
Let's talk color first. For my first fabric selection, I went with a Split Complementary color plan. I did cheat a bit and used the colors from that fabulous tulip print. That is a technique that is really easy and will help some of you that claim you are color challenged. Check the selvage circles and pull from there. These colors registered on tabs: Aqua-Green (7), Yellow-Green (3) and Yellow-Orange (22).
For my second fabric selection, I went with a Complementary color plan, selecting my light and medium from Chartreuse (2) and my dark from directly across the color wheel, the Red-Violet (14).
Ok, so let's talk about this new technique, it is from the Studio 180 Design Technique Sheet, Pickets and Quickets. If you love this technique, make sure to purchase the Technique Sheet at my Etsy shop
You will find the size requirements for this week's block in the download, but here are some basic directions, with photos, which I know sometimes helps. So, we are going to start with a large and a small square for each set of Pickets/Quickets we need. You will mark 2 stitche lines on the wrong side of all the small squares, using your Quilter’s Magic Wand.
Position the small squares in the corner of the large square, right sides together, a few threads from the edge. Go ahead and stitch along the lines and then cut the center diagonal of the two squares, pressing towards the small square. I like to leave my needle down when doing this and pivot at the bottom, coming across to the other line and stitch.
Stack your units into 2 sets as shown.
You will cut one set at a time. Start with the set on the right. Position the Wing Clipper tool over your unit, aligning the diagonal ruler guide on the diagonal seam, making sure the unit is positioned to the correct size on the Wing Clipper (see the download for the measurements). Trim the two sides.
Rotate your unit 180°, aligning your just trimmed edges to the proper size. Trim the remaining sides.
Next, take the other set. At first, this may look slightly different under your Wing Clipper, but it is just the mirror image. Repeat the steps for the mirror image unit, setting up your first cut as shown below, trimming the two sides. Then rotate, line it up to the proper size and trim the remaining 2 sides.
Now you have a pair of Pickets/Quickets!
Isn't that fabulous!
Now, for additional tips and tricks, I can not stress this enough... Take a photo of your units laid out, prior to sewing! Can you see the mistake below? Thank goodness I take photos.
You want to make sure that your Quarter Squared Triangles (QST) all have the background toward the center. See that left QST? I needed to rotate it prior to sewing. Thankfully, I caught it.
Also, you want to make sure you are looking for those tulips to form, if you double check for them, you should be good to go!
In the download, I provide pressing instructions, that will allow your seams to nest when you sew your rows together. If you think it is too much bulk, press open (I do). Also, please make sure you are taking the time to set your seams, finger press, and press. Don't be afraid to hit the block with a little Best Press to keep them nice and flat.
That is it for this week! Hope you love Rising Sun as much as I do. Don't forget to download this weeks block, it is only available until Thursday, February 22nd!


Comments
Post a Comment