Yeah! I love this block.
Black
Beauty, by Nancy Cabot, appeared in the Chicago
Tribune, July 14, 1933. This is one
of those blocks that has been known by several names, but rarely seen.
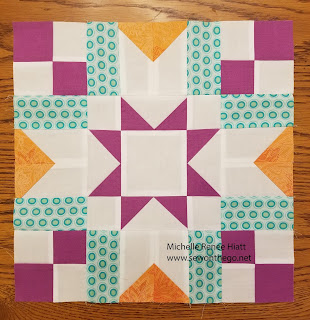 |
| Block 8 - Michelle's Fabric Selection 1 |
In 1938, Nancy Cabot herself, published this block under another name, Stars and Stripe, again in the Chicago Tribune. Nancy Page, published it as Dover Square, in the Birmingham News, in 1943, which is around the same time the original Black Beauty movie came out, so you wonder if that had anything to do with Nancy Page calling it by a different name. Block, after block, I find references to Nancy Cabot and Nancy Page publishing similar blocks, often by different names, sometimes within the same year or only a short time apart. It makes you wonder what those two ladies thought of each other, or did then even know of each other given the distance.
 |
| Block 8 - Fabric Selection 2 |
Okay, let's talk color first. Often when I'm selecting fabric, I go to a border fabric or inspiration fabric. Sometimes that fabric ends up in the block(s), and sometimes it doesn't. My first fabric selection, I looked at my design wall, and knew I need more blue. So I went to my "targeted" accent fabric for this set of blocks and started pulling fabrics. Going with a Triadic
color plan, pulling Aqua-Green (8), Red-Violet, Yellow-Orange (22). I love how it turned out!
 |
| 1st fabric selection |
For the 2nd fabric selection. I went with a Complementary color plan, pulling the medium-dark and medium from Purple (15) and the light-medium from Yellow-Green (3).
 |
| 2nd fabric selection |
My scrappy versions (wow do I love them), I went with a Triadic color plan for my Alison Glass scrappy version, and a split-complimentary color plan for my Kaffe Fassett scrap version
 |
| Alison Glass scrappy version |
 |
| Kaffe Fassett scrappy version |
So, let's
talk about construction of Block 8, Black Beauty. We will be making Flying Geese and Pickets/Quickets with our Wing Clipper. If you need a refresher, on the Pickets/Quickets, check out last week's Block 7 blog post.
This week, I'm featuring the new Studio 180 Design tool, the Four Patch Square Up. If you struggle with making four patches, and you have checked your 1/4" seam allowance and end up with four patches that are just too small, you should consider purchasing the Four Patch Square Up.
In the download, I've provided both the traditional and the Four Patch Square Up method. It is really easy to "tuckerize" your four patches, all you need to do is add 1/8-1/4" to the cut strips size. If you hate to cut 1/8" measurements, go ahead and round up a 1/4".
So, if your pattern states, cut the strips 2", cut them 2 1/4". Simple! You will make the four patches in the same manner you normally would, but your cutting will be slightly different. As stated above, I included step-by-step in the download, for both traditional and using the
Four Patch Square Up, but let me show you, a picture is worth a thousand words:
- Position your strips right sides together. Stitch down one long edge of the strips with a ¼” seam and press the seams to the darker fabric. Cut your strip in half crosswise.
- Reverse one half over the other so each color is opposite the other color and nest the seams well.
- When you go to sub cut the strip, this is where you will use your "tuckerized" measurement, add the extra 1/4". So, if you cut your strips at 2 1/4" instead of 2", go ahead and sub cut at 2 ¼”. Do not separate the layered pairs.
- Stitch down the long side of the layered pair. I usual place my units so that the top seam is going away from me (with the darker fabric at the tip of my needle), as stitching into the seam will have my sewing machine's feed dogs doing the work, pushing that seam together, creating a perfect center.
- Press the unit so that the seams swirl. To swirl the seam lay the last sewn seam north and south, place your thumbs on opposing darks (left thumb on right-side dark, right thumb on left side dark), and twist your wrist. This should open that seam and create a mini four patches on the back.
- Now, pull out that Four Patch Square Up tool. Locate the selected size circle on the tool (3 in our example). These numbered circles are located above the words Finished Size Four Patches - Centers.
- Position this circle over the seam intersection of your four patch unit. Line up the dashed lines radiating from the center with your seams. Trim the first two sides.
- Rotate the unit 180°. Realign the finished size circle with the center and dashed lines with your seams. Also make sure that the just cut trimmed edges of the unit are aligned with the cut size cleanup line (3 ½” in our example) . Trim the remaining two sides to measure 3 ½” cut.
How fabulous! Perfect!
Similar to last week, my last tip is to take a photo of your block when you have the units laid out, BEFORE YOU SEW! Those four patches can play tricks with you on those corners. Please make sure to take time to read the pressing instructions as pressing is a little tricky this week.


Comments
Post a Comment