Sorry for the delay, it has been a crazy busy week. On top of that, this week have one of the more challenging blocks in the Holiday Solstice Mystery Series. The individually techniques aren't difficult, but you have to concentrate on having a perfect 1/4" seam allowance and keeping your orientation.
I can not stress enough, how important it is to:
- Read the tips below
- Read Clue from start to finish
- Read the tips below
- Go step-by-step and don't assume anything.
If you read today's blog post, I cover all the place people typically run into trouble.
A lot to cover so I'm going to get started.
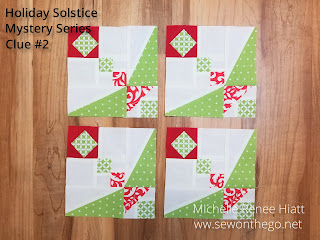
This week's block is Drifted Snow. The Drifted Snow Block is made up of a Square Squared, Four-Patch, Shaded 4-Patch and a pair of mirror image Split Rects.
This week, for my Fig Christmas, I'm using the same Light-Medium through out the block, it draws your eye. When trying out fabric, I like to lay it out similar to the position it will have in the block.
For my alternate, Sun Prints 2020 group, I'm going with a double Complementary Plan. Electing 2 sets of colors that across the color wheel.
Okay, so let's talk tips. First, read my tips below. Then Read the download from start to finish first. Then, read the tips again... then pick your fabric.
Square Squared-
We made a Square Cubed in Clue #1, this is similar except, we cut our center squares, from a strip that is slightly oversized. We will use the Square Square to precision cut those center square, using the finished sized published in the download.
Right Hand - Precision cutting the center squares.
 |
Line up
|
 |
Trim the side and then give the top a hair cut.
|
Left Hand - Precision cutting the center squares.
 |
Line up.
|
 |
Trim side and give the top a hair cut.
|
 |
| Make sure to line up your Side Triangles and get your orientation. |
 |
| Important, sew with the Center on top, for each step. |
Okay, if you run into any trouble read the clue and check out Clue #1 for more photos.
Four-Patches-
Most important things to remember when making Four-Patches is your 1/4" seam. I can't say it enough. If you want, take your needle and move it one step to the right, to give you one that is just shy of 1/4".
Keep your stitches straight.
 |
Be careful when pressing to make sure you have them all the way open.
|
 |
I like to nest mine at the iron, and give the a good press together.
|
 |
Always sew with the seam away from you, so that your feed dogs help you keep them together.
|
Now to swirl your seam.
 |
Set your seam.
|
 |
Lay them flat.
|
 |
Take your fingers and push the seams towards the Medium A and Light-Medium.
|
 |
| This will give you a little four-patch on the back. |
 |
Give a good press and tada you have swirled your seam.
|
Shaded Four-Patch Unit
Okay, this unit isn't hard, but a lot of quilters struggle. You want to take this step by step and read.
 |
| Cut and sew your strips together. Make sure to press to the wide strip - Very important. |
 |
Fold the strip in half to get to finger press the halfway mark.
|
 |
Use your ruler to cut in half.
|
 |
Next place the strip on to the other half but place the backgrounds opposite each other.
|
 |
| Make your sub cuts. |
 |
| Sew with a good 1/4" seam allowance. |
 |
Next, fold the unit in half to get your halfway mark.
|
 |
Nip the seam where that halfway mark is, and cut to the seam
|
.
 |
Next, press each side to towards the background, they will be pressed in opposite directions (which is why we nipped the seam).
|
 |
Give the front a good press.
|
 |
Turn the unit over and find where the seam cross on the corner of the patch. I like to mark it. If you didn't follow the pressing, you will not see this stitch cross.
|
 |
| Next you are going to line up your Tucker Trimmer and use one of it's 45 degree angles. Line that up with one of the sides and make sure the edge is on that seam cross your marked. |
 |
| Turn it around and do the same on the other side. |
 |
You should have 2 lines, neither hits the corner, both are off a few threads. They aren't suppose to hit the corner, the lines are suppose to be 45 degrees off the edges while crossing that thread intersection.
|
 |
Pair with the Rectangle, they will not be the exact size. That is okay. Before you sew, make sure none of your lines goes through the corner squares - MOST common mistake.
|
 |
Sew on the lines with a foot you can see the needled. Don't start with the line near the corner, come in and start with that line.
|
 |
| Next trim them 1/4" from the seam. There is a little more than a 1/2" between, so you may want to cut as I did, removing the extra seam allowance. |
 |
Give them a good press with a Mister of Best Press
|
 |
You will use your Tucker Trimmer III to trim down, make sure you have to proper size lined up on the long seam and the common diagonally is intersecting the square. Trim two sides.
|
 |
Turn the unit 180 degrees, line up and trim again.
|
 |
Tada!
|
Left Handed
 |
| You will use your Tucker Trimmer III to trim down, make sure you have to proper size lined up on the long seam and the common diagonally is intersecting the square. Trim two sides. |
 |
| Turn the unit 180 degrees, line up and trim again. |
Not so bad, right. Step at a time.
Okay, next is going to be easy pease after that.
Split Rects
The most important thing to remember is to place your strips either right side up or right side down depending on the steps. Split Rects units have a #1 and #2. And no, no matter how you flip them, with they be the same.
If you are working with Batiks other two sided fabric, be very careful.
Right Handed
 |
| Split Rects #1 - Right side up - Both strips Background and your Medium |
 |
Very similar to the V Block Side Triangle cuts. Line up the bold and size and cut.
|
 |
Rotate the Split Rect tool 180' and find the 2nd trim line and cut.
|
 |
Tada .... Repeat.
|
Left Handed
 |
Split Rects #1 - Right side up - Both strips Background and your Medium.
|
 |
Very similar to the V Block Side Triangle cuts. Line up the bold and size and cut.
|
 |
Rotate the Split Rect tool 180' and find the 2nd trim line and cut.
|
 |
Tada... Repeat
|
 |
Check to make sure you lay them out properly.
|
Split Rects #2
Left Handed
 |
| #2 - Line up with the size line and double check that you are within the proper finished size and trim. |
 |
| Rotate unit 180', line up and trim. |
 |
Tada
|
Right Handed
 |
#2 - Line up with the size line and double check that you are within the proper finished size and trim.
|
 |
| Rotate unit 180', line up and trim. |
 |
Tada
|
Block Construction
 |
| BE CAREFUL - Double check your layout. Only focus on the Square Squared, Four-Patch and Background squares first. This is a four-patch. |
 |
Alternate
|
 |
While you will press the rows towards the Background Square, you will want to press the last seam in the Large Four-Patch unit open with the Seam Stick
|
Next lay out the Block - BE CAREFUL WITH THE SPLIT RECTS
 |
Triple Check your orientation!
|
 |
Sew into Rows and press toward the Split Rects.
|
 |
Then press the last seam open and TADA!
|
 |
I love this block!
|
Did you make it? I hope so. There are about 6 challenge blocks in the series, this is one. It is worth it, I promise and I will be easy on you next week given the holiday.
Take care, be well.
Keep stitching,
Michelle


I LOVE this block. You were right; it was a challenge (I did get a couple sub-blocks stitched backwards). But with a little persistence (and the help of my trusty seam ripper) I was able to complete them correctly. Yah!!!!
ReplyDelete