Yeah another pretty Friday here in Connecticut! Hopefully the weather holds up for a nice Father's Day weekend.
Another busy week here!
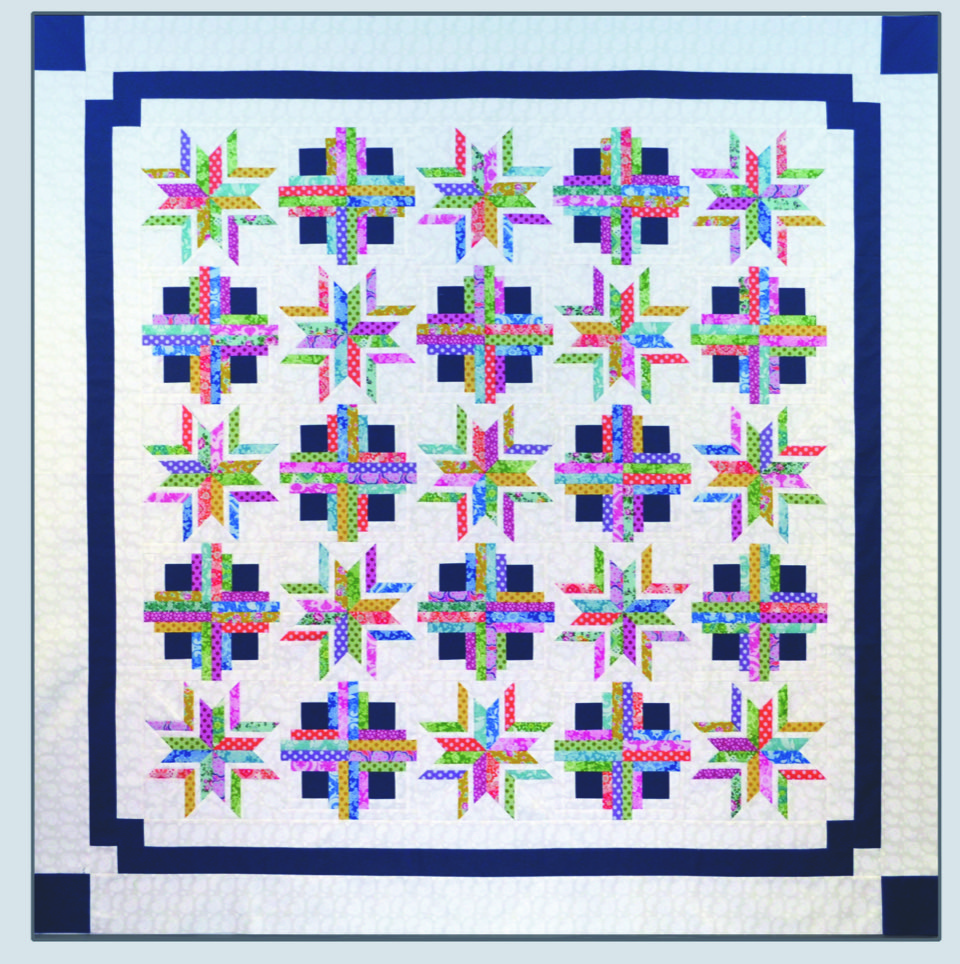
Majesty Lemoyne is off to the printers! To create the
Majesty Lemoyne I've taken strips of different sizes to create a fabulous looking block, and paired it with a more modern Log Cabin Block. I added an Empire Border and I love it! It really comes together easily with the Studio 180 Design's
Rapid Fire Lemoyne Star and
Tucker Trimmer III. You can
pre-order your copy here. They should ship Friday, June 21st.
 |
| Majesty Lemoyne! |
I will be teaching Majesty at
Quilt Odyssey (Hershey, PA in July),
Sleep in your Bed Retreat @ The Yankee Quilter (Seymour, CT in Sept),
Sleep in your Bed Retreat @ Pennington Quilt Works (Pennington, NJ in Nov), and then
Quilters' Holiday Escape Retreat (Rindge, NH in early Dec).
We are at
Clue #5 of Holiday Extravaganza! This week's block is
Shaded Four-Patch Five! Really fun! You will make 4 Blocks which are are made up of two different color sets of Shaded 4-Patch units, totalling five Shaded 4-Patch units in each block.
I always enjoy the Shaded 4-Patch technique, it is really neat. We will make it using our
Tucker Trimmer III or I. While I've given you the
specific sizes and cutting instructions, for this block in the
download, there is a Studio 180 Design Technique Sheet,
Shaded Four Patch, that provides the cutting instructions for 21 different sizes, from 2” to 12". Shaded 4-Patch can create endless designs on their own.
Plus, the unit works awesome in other blocks. I recently used this technique in
Moonlight Garden and the soon to be released Retreat.
Since this is a new technique to the series, I've given you a pictorial on key steps and some other tips and tricks:
NOTE: If you are new to this technique, you are going to think that this is never going to work and that I must be crazy, but I promise you it works. 😘 Remember the details are in the
download available through Thursday, the 20th.
1.
Gather the (2) narrow Light-Medium Strip and (2) wide Background Strips.
2.
Stitch the narrow Light-Medium Strips together to the wider Background strip and
press the seam towards the wide strip.
 |
| Press towards the Wider Strip (yes I know it is Background, but yes this is needed) |
3.
Pair the two matching strip sets, with right sides together, with the narrow strips on
opposite sides so each narrow strip faces a wide strip.
 |
| Opposites |
4.
Cut matching strips set into sections, leaving them together.
 |
| I line up the seam with a line on my ruler. I double check the edges, but I use the seam to line up |
 |
| Leave them together |
5.
Stitch the sections together along one long side. Once sewn, snip the seam allowance at the halfway mark between the two squares all the way to the seam. Important,
press both seams away from the square.
 |
| Fold in half |
 |
| Snip at the halfway mark, just snipping to the seam |
 |
| Perfect |
 |
| Press the seams away from the squares, this will allow you to see all the seams of the square - very important |
6.
Mark a 45° angle through the small patch seam intersections. With your Tucker Trimmer I, use the 45° angle, place it on the top edge of the unit and draw a 45º sewing line from top to bottom, through the corner of the small square where the stitching lines intersect. Repeat for the other square, drawing a second 45° sewing line through the corner of the other square. Repeat for all units.
I used a
Sewline Pencil to draw my lines; thin and the chalk bounces off as I sew, leaving my quilt block and top free of lines that could reappear later.
 |
| 1st line |
 |
| 2nd line |
7.
Center each of the marked Units right sides together with a Medium Rectangle. They may not be exactly the same size, but close, and you will be trimming them down later, so it doesn’t matter at this point.
 |
| Pin to the proper Rectangle |
8.
Stitch on both marked sewing lines, on each of the units. Using a rotary cutter and a ruler, cut between the two stitching lines. Note: if you make one cut between the lines, the seam allowances will be a bit over ¼”. If you like your seam allowances to be exactly ¼”, you can make two cuts, each ¼” from your stitching lines.
 |
| Use a nice open toe to be able to see your lines nicely |
 |
| Stitch on both lines |
 |
| I'm okay with the larger than 1/4" seam, I trim most often just once down the middle |
9.
Press the seam
towards the large triangle.
 |
| Add caption |
|
| Add caption |
|
| Add caption |
10.
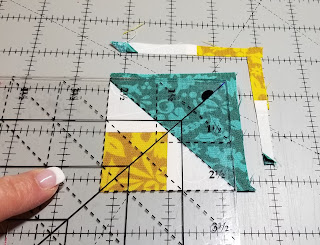
Trim. Position the proper sizing diagonal of the Tucker Trimmer I on the unit so that it lines up with the Diagonal Seam line of the Shaded 4-Patch. Position the Common Diagonal line so it passes through the corner of the small square at the center of the Unit and trim the first two sides.
 |
| Right Handed ~ 1st trim ~ Be sure to trim the corner with the square first |
|
| Left Handed ~ 1st Trim ~ Square in upper left corner for first trim |
11.
Rotate fabric unit 180° and line up the proper Cut Size lines on the Tucker Trimmer I with the previously trimmed raw edges. Check to be sure the proper sizing diagonal aligns with the diagonal seam of the unit and the small square matches up with the Common Diagonal on the Tucker Trimmer. Trim both remaining sides.
 |
| Right Handed ~ 2nd Trim |
 |
| Left Handed ~ 2nd Trim |
TADA! Repeat for all units!
 |
| Tada ! ~ Right Handed |
 |
| Tada ! ~Left Handed |
My only other tip is Orientation. Be careful to check that you have you colors in the right place and in the proper orientation,
Such fun! My two fabric selections:
 |
| Holiday |
 |
| Vintage Christmas |
Well, that is it for this week. I'm hoping to wrap up my Retreat Quilt Pattern this weekend. Monday I'm off to Delaware to visit with the
Lady Bug Quilt Guild! So excited, I'm giving a lecture and a workshop on my Sparkle Quilt! The week after next is
Vermont Quilt Festival. A busy two weeks!
Have a great weekend!
Keep Stitching,
Michelle


Comments
Post a Comment