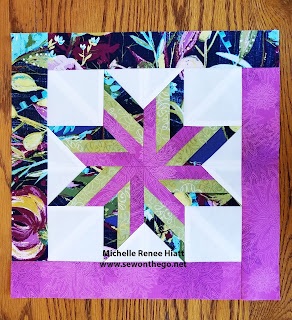
Block 47 ~ Liberty Star! Second to last block in the Timeless with a Twist Series!
Block 43, Liberty
Star, credited to Eveline Foland, was published in Kansas City Star, on August 10, 1932.
 |
| B47 ~ Liberty Star ~ Michelle's Fabric Selection 1 |
This block is a Lemoyne Star, made with three
strips pieced into a diamond. Then, set
spinning clockwise, bringing the inner strips together in the center. Finally,
the Liberty Lemoyne Star is framed using a set-in seam. This block was later published as Star of
Strips, in 1977 in the Aunt Martha Series, in Bold and Beautiful Quilts (1977).
This is a fabulous block to use in Christmas, Patriotic, or a Quilt of
Valor. The Liberty Lemoyne Star frame
will provide a lot of dimension, even in a one block quilt.
We are going to make the Liberty Star, using the Rapid Fire Lemoyne Star Tool and the Liberty Lemoyne Technique. Similar to the Banded Lemoyne of last week, this technique is available as one of the Lemoyne Technique Sheets. I've provided a pictorial of this technique below.
Let's first talk color;
For my first fabric selection, I went with a Split Complementary color plan, selecting the Chartreuse (Light) first, going across the color wheel to the Blue-Violet (12) - Purple (15). I was able to use the large print multi-color floral for my dark, since it would have a high contrast against the pure white background and the tone-on-tone Chartreuse. I love the overall effect of the floral on the star points.
 |
| Michelle's Fabric Selection 1 |
For my second fabric selection, I went with a Triadic color plan, select the Golden Yellow (24) first, as my blocks need some yellow. Then selecting the Dark Aqua Blue (8) and Fuchsia (16). So fun!
 |
| Michelle's Fabric Selection 2 |
Okay, let's talk about this fabulous new-to-the-series technique, Liberty Lemoyne Star! In the download (available through Jan 3, 2019). I've provided measurement for this size block, you can get measurement for sizes 6"- 12" on the Liberty Lemoyne Technique Sheet.
Similar to the last block, you are going to want to make sure you are paying close attention and going step-by-step.
Let's get started.
For both the “A” and “B" Sections
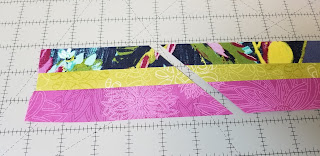
1. Gather the medium, light, and dark strips, these will make up your Diamond Star Strips
2. Layout your colored diamond strips as shown in the download. Note the widest colored strip will be in the center of your star and the strip in the middle will be in the middle of your diamonds
3. Stitch strips into two sets, one will be for your "A" sections one will be for your "B" sections. Press all seams toward the widest medium (inner) strip. Repeat for both strips.
 |
| Both Sets should be sewn the same way |
 |
| Press all strips toward the Dark wide strip |
4. Sew one strip set to the background strip to make a "B" section strip. You will
perform this using the standard Rapid Fire Lemoyne Star (RFLS) method, by positioning
the strip, on the left side of the Background strip, and the width of the strip from the top of the
Background (right sides together and stagger). Stitch the strips using a ¼” seam.
Press the seam toward the strip set.
 |
| Folding the Background Strip will get you the width of the strip |
 |
| Press toward the Strip Set |
5. Cut. Take the "B" section to the cutting mat, place right side up. This will look slightly different as you are used to seeing another strip set on top. You will now set your 45-angle using the RFLS and make your diagonal "First Cuts" the proper width (available in the download) across the length of the strip, checking your angle with the RFLS Ruler, until you have a total of (4) unit “B”.
 |
| Set the angle |
6. Cut again. Make the vertical "Second Cuts" to each slice. Make sure to leave a small gap between the tip of the diamond and the start of your vertical cut. This gap should be one eighth to one quarter of an inch. Right handers you may want to use a double ruler method if you can’t eye one quarter of an inch well. Pay attention here!
 |
| You want to add a 1/4 to the tip. This is easy for Lefties. The Righties may want to try doubling the ruler to get the exact measurement |
 |
| Righties can pull away the right ruler and cut (Lefties are already on the next step :) ) |
 |
| Tada! |
 |
| Trim with RFLS |
For the "A" Sections
8. Cut the Background squares into small and large half squares triangles by cutting a diagonal that is ¼” away from the true corner to corner diagonal.
 |
| Same as last week, 1/4" off of center |
9. Cut the second strip set of into individual diamonds. Place strips right side up on cutting mat as shown and use the back end of the RFLS tool to cut the diamonds to the proper size, this is considered the "Fussy Cut" technique for the RFLS. Note: You will have to turn the first cut, 180° and give a second trim, then you can continue down the strip, repeating until you have 4 “A” Units (Similar to Diamond Rects technique).
 |
| Follow the guideline, making sure the unit is within the strip |
 |
| Make your first cut |
 |
| Line the just cut edge up with the guideline |
 |
| Trim |
 |
| Then continue down the strip |
10. Layout, stitch, and press. Lay out the fussy cut diamonds, the large and small half square triangles right sides up as shown in the illustration, similar to the Banded Lemoyne Star technique. Stitch the large triangle in place first and press seams toward the background fabric. Stitch the small triangles next and press these seams toward the diamond section. Trim along both sides of the ruler.
 |
| Back - Pressed neatly! |
 |
| Trim |
11. Stitch, press, and complete block by stitching the triangles together into quarter squares, the quarter squares together into block halves and the halves together into completed block. Trim “dog ears” as you go and press all the seams open. Note: Use your Magic Pressing Mat, Seam Stick and Quilter's Magic Mist, you need your best pressing skills here!
 |
| Quarters |
 |
| Press using your Seam Stick |
 |
| Trim the dog ears |
 |
| Match up the Halves |
 |
| Create the Halves and press well |
 |
| Pin for the perfect center |
12. Trim to Size, once the block is complete, trim to proper size. Use the Tucker Trimmer III, placing the half circle corner the upper right corner, if you are right handed or place the half circle corner in the upper left corner if you are left handed. Simply align to the proper size diagonal cross hairs of the ruler with the diagonal seam lines of the pieced block and trim.
 |
| Line up that X |
13. Rotate the block and repeat for other two sides. ¬The block is immediately centered, and all edges will have the correct ¼" seams.
 |
| Tada |
Now for that set-in seam!
14. Lay out block according to the layout shown.
 |
| Layout |
15. Sew a partial seam connecting the medium rectangle on the right side of the Liberty block first, leaving a few inches unsewn. Press towards the Rectangle.
 |
| Stop a few inches early |
 |
| Press |
16. Then working counter clockwise sew the dark rectangles, then the Medium rectangle, pressing the seams towards the rectangles.
 |
| Continue Counter Clockwise |
 |
| When you get to the fourth, pin the first strip back so you don't catch it |
17. Once you have the fourth rectangle sewn, then complete the stitching of the first Rectangle.
 |
| Press it neatly flat again at the bottom and stitch to the end |
 |
| Press & Tada |
Tada!
That wasn't so bad, right!
Can you believe we only have one more block? I can not. It is exciting and a little sad at the same time.
Important information:
I will release the 48th (and last) block this weekend. Sorry, I have a Friday commitment, so I released this block early and the last block will be this weekend.
I expect to release the 48 Block quilt setting (which is a KING) sometime in early January. Make sure you are paying attention to the Timeless Facebook Group, as I'm adding a few small projects to the books, and may need some testers. I will be soliciting testers within that group. Also, I would love to see final quilt projects, using the blocks so make sure you continue to post those to the group!
Also, I'm planning a virtual Show & Tell, for the finish quilts (with prizes), so stay tuned to the blog and newsletter! I hope all of you Timeless with a Twist followers are planning doing the Sunset on the Sound Mystery. Wait to you see what I have after that!
That's it for today! Block 48 will be released this weekend, so follow the Blog or keep an eye on your mailbox!
Keep Stitching,
Michelle


Comments
Post a Comment