Happy 4th of July! - Block 23!
I hope everyone is enjoying their 4th of July week in USA. I have a somewhat fitting block for you this week. Block 23, is Peaceful Hours, published in Farmer’s Journal and Farmer’s Wife, 1945. The name is very fitting for this block as it features Hourglass blocks (Quarter Square Triangles) that have been fragmented (split), and it was published in 1945, which marked the end of World War two. The block radiates from the center giving it such movement, almost spinning.
As with each block, I say I love it. :)
The Peaceful Hours Block is made up of Split Quarter Square Triangles, Half Square Triangle, and a Snowball unit. Below I will provide a pictorial for making both unit; the Split Quarter Square Triangle using your Tucker Trimmer and the Snowball unit made using your Corner Pop.
For these week's color plans, I used pictures from my garden to inspire me. Without really thinking about it, I've seem to plant in a triadic color plan.


Pulling from the photos the Magenta (17), the Turquoise (9) and the Yellow (1).
Now onto this week's lessons; Split Quarter Square Triangle and Snowball units. Remember all the measurements are available in this week's download.
Let's start with the Split Quarter Square Triangle. We are going to make the Quarter Square Triangle the same as always
1.Gather the Squares; (2) Dark, (1) Light, (1) Background
2. Mark and position squares. Mark two stitching lines ¼” on either side of the center diagonal of the Dark Squares. Perform this using the Quilter’s Magic Wand. Position the squares with right sides together; placing (1) Dark square to a Light square and (1) Dark square to a Background.
3. Stitch on the marked sewing lines, and then cut down the middle. Press seams toward the darker of the fabric.

4.Then position the pairs, each of the Dark/Light squares with each of the Dark/Background squares, right sides together, alternating the Dark fabric. Mark 2 lines, ¼” off center, using the Quilter’s Magic Wand. Stitch on the drawn lines and cut diagonally between the stitch lines. Press open (or swirl/spin the seams).
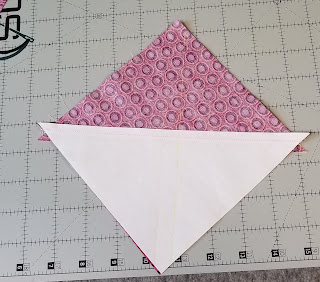

5. Position the Tucker Trimmer over the pieced square, carefully align both the common diagonal and the proper size diagonal over the sewn seam lines of the fabric square. Trim the side and top to create one clean cut corner.

6. Rotate the unit 180° and line up the Tucker Trimmer again and trim the two remaining sides to measure the proper size.
7. Repeat for all 4 Units
8. Now it is time to Split! If you are right handed, position the unit so that the light is to the right, to the left if you are left handed.
9. Position the Tucker Trimmer over the unit, carefully align both the edge of unit up with the 4” line the common diagonal and the 4” size diagonal over the sewn seam lines of the fabric square. Leaving 1 ½” of the light fabric side of the unit exposed.

10. Trim the unit, making the unit 4” x 5 ½” (cut size). You can discard the cutoff or save in your scrap bag.

11. Alternatively, you can use a ruler and trim 1 1/2" off the light side.

12. Both techniques will net you the same result as long as you are careful to double check your measurements prior to trimming.

13. Repeat for all 4 units.
Next, let's make the Snowball Unit with our Corner Pop. Again, remember all the measurements are available in this week's download.
14. Gather the Medium Square and (4) Light Half Square Triangles. The Half Square Triangles will become your replacement Triangles.
15. Position the base Medium Square right side up on your cutting mat.
16. Position the ruler over the corner of your square, aligning the corner with the proper cutaway lines on the tool as illustrated in the graphic below. Trim. Repeat for all squares.

17. Position and Stitch replacement triangle onto base. Center one Light half square replacement triangle with its long side on the just trimmed corner of each base square and stitch using an accurate ¼” seam. Press seams toward the replacement triangle. Repeat for all Squares.
18. Trim. Position the Corner Pop® tool on the popped square unit to trim down the newly added corner using the 1 ½” Corner Trim Down line. Align the diagonal guideline with the newly sewn seam and the ruler edges with the raw edges of the unit, making certain the base unit remains 5 ½” and trim. Repeat for all (4) popped square units.

19. Next, repeat steps, until you have popped and replaced all four corners of all 4 units. They base block should remain the same size it started.

Those are my tips and tricks for today.
I'm actually home this week with extended family, resting up for four weeks of upcoming travel to MAQ, Quilt Odyssey, Maine Quilts and a Rangeley Retreat. I hope to see many of you at one of the events!
I hope you are enjoying your holiday week. If you are looking for the download, make sure to read the tutorials and you will find them.
Keep Stitching,
Michelle
 |
| Block 23 ~ Peaceful Hours ~ Michelle's Fabric Selection 1 |
As with each block, I say I love it. :)
The Peaceful Hours Block is made up of Split Quarter Square Triangles, Half Square Triangle, and a Snowball unit. Below I will provide a pictorial for making both unit; the Split Quarter Square Triangle using your Tucker Trimmer and the Snowball unit made using your Corner Pop.
For these week's color plans, I used pictures from my garden to inspire me. Without really thinking about it, I've seem to plant in a triadic color plan.


Pulling from the photos the Magenta (17), the Turquoise (9) and the Yellow (1).
 |
| Michelle's Fabric Selection 1 |
For my second color plan, I also went with a triadic plan. In looking at my blocks, I felt I needed some more Orange. So, I started there with Orange (21), then pulled the Violet (13) and then the green (5).
 |
| Michelle's Fabric Selection 2 |
Let's start with the Split Quarter Square Triangle. We are going to make the Quarter Square Triangle the same as always
1.Gather the Squares; (2) Dark, (1) Light, (1) Background
2. Mark and position squares. Mark two stitching lines ¼” on either side of the center diagonal of the Dark Squares. Perform this using the Quilter’s Magic Wand. Position the squares with right sides together; placing (1) Dark square to a Light square and (1) Dark square to a Background.
3. Stitch on the marked sewing lines, and then cut down the middle. Press seams toward the darker of the fabric.

4.Then position the pairs, each of the Dark/Light squares with each of the Dark/Background squares, right sides together, alternating the Dark fabric. Mark 2 lines, ¼” off center, using the Quilter’s Magic Wand. Stitch on the drawn lines and cut diagonally between the stitch lines. Press open (or swirl/spin the seams).


5. Position the Tucker Trimmer over the pieced square, carefully align both the common diagonal and the proper size diagonal over the sewn seam lines of the fabric square. Trim the side and top to create one clean cut corner.

6. Rotate the unit 180° and line up the Tucker Trimmer again and trim the two remaining sides to measure the proper size.
7. Repeat for all 4 Units
8. Now it is time to Split! If you are right handed, position the unit so that the light is to the right, to the left if you are left handed.
9. Position the Tucker Trimmer over the unit, carefully align both the edge of unit up with the 4” line the common diagonal and the 4” size diagonal over the sewn seam lines of the fabric square. Leaving 1 ½” of the light fabric side of the unit exposed.

10. Trim the unit, making the unit 4” x 5 ½” (cut size). You can discard the cutoff or save in your scrap bag.

11. Alternatively, you can use a ruler and trim 1 1/2" off the light side.

12. Both techniques will net you the same result as long as you are careful to double check your measurements prior to trimming.

13. Repeat for all 4 units.
Next, let's make the Snowball Unit with our Corner Pop. Again, remember all the measurements are available in this week's download.
14. Gather the Medium Square and (4) Light Half Square Triangles. The Half Square Triangles will become your replacement Triangles.
15. Position the base Medium Square right side up on your cutting mat.
16. Position the ruler over the corner of your square, aligning the corner with the proper cutaway lines on the tool as illustrated in the graphic below. Trim. Repeat for all squares.

17. Position and Stitch replacement triangle onto base. Center one Light half square replacement triangle with its long side on the just trimmed corner of each base square and stitch using an accurate ¼” seam. Press seams toward the replacement triangle. Repeat for all Squares.
18. Trim. Position the Corner Pop® tool on the popped square unit to trim down the newly added corner using the 1 ½” Corner Trim Down line. Align the diagonal guideline with the newly sewn seam and the ruler edges with the raw edges of the unit, making certain the base unit remains 5 ½” and trim. Repeat for all (4) popped square units.

19. Next, repeat steps, until you have popped and replaced all four corners of all 4 units. They base block should remain the same size it started.

Those are my tips and tricks for today.
I'm actually home this week with extended family, resting up for four weeks of upcoming travel to MAQ, Quilt Odyssey, Maine Quilts and a Rangeley Retreat. I hope to see many of you at one of the events!
I hope you are enjoying your holiday week. If you are looking for the download, make sure to read the tutorials and you will find them.
Keep Stitching,
Michelle


Link for this week's download leads to the retreat page. Am I missing something?
ReplyDeleteI think if you scroll WAY down on the retreat page you will find the link to the download of the block. I know---It took me AWHILE to find it, too, several weeks ago. Hope this helps!
DeleteThank you - I found it! I thought I was going nuts ;)
Delete