Block 46 ~ All American Star!
 |
| Block 46 ~ All American Star ~ Michelle's Fabric Selection 1 |
The All American Star will come together easily with the Rapid Fire Lemoyne Star using the Banded Lemoyne Technique. If you love this technique you can pick up the Banded Lemoyne Technique Sheet and make sizes from 4" to 12". I will walk you through the technique below.
Let's talk color first; For my first fabric selection, I went with a Split Complementary plan. Electing the Red-Violet (14) for my dark, then going across the color wheel and pulling the tabs Golden Yellow (24) through Green (4). I found two great fabrics that read as that Golden Yellow and then a print that had a lot of yellows and greens.
 |
| Michelle's Fabric Selection 1 |
 |
| Michelle's Fabric Selection 2 |
Banded Lemoynes
1. Gather the light and medium diamond strips and (2) Dark Strips.
2. Pair the Light (A) and Dark(B) colored diamond strips with Dark Band strips to make strip sets. Position each A diamond strip, on the right side of the Band strip and the width of the band down from the top of the Band Strip (right sides together and stagger as described above). Position each B diamond strip, on the left side of the Band strip, and width of the band down from the top of the Band Strip (right sides together and stagger as described above). Stitch the strips using a ¼” seam.
 |
| A & B after one strip applied |
 |
| A & B |
 |
| A - You can place the A Diamond almost to the bottom, leave the width of the strip |
 |
| B - Start applying the B Diamond about a width of the strip down |
6. Place Invisigrip on the wrong side of your RFLS™ and using a permanent fine marker, mark two guidelines on the invisigripped ruler. The guidelines should be marked 1” on the “pointy” end of the ruler and they’ll run parallel to the edge of the ruler. You will use these guidelines to clean up the banded edge of your pieced diamonds. These marks should be made the same distance from the edge and they should also be made narrower than the width of your banding strips.
 |
| Lines applied! |
7. Position marker guidelines on the seams between the diamond and the banding to trim down the pointed end of the banded diamond.
8. Cut the Background squares into small and large half squares triangles by cutting a diagonal that is ¼” away from the true corner to corner diagonal.
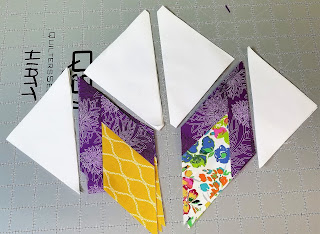
9. Lay Out trimmed, banded diamonds, large and small Background triangles right sides up as shown in diagram. Be sure to position all pieces in the correct orientation. Follow the pressing arrows below. Tip– Layout the units on a paper plate, so that you can “see it” to ensure it matches the diagram, then “flip it” to prepare for sewing (pin if needed), and “sew it” with your best ¼” seam.
10. Stitch the large triangles with the banded diamond first and press as indicated. Then stitch the small triangles and press again according to the previous diagram.
 |
| I like to trim the dog ears |
 |
| Most forgotten step ~ MUST TRIM |
 |
| Get out those Pressing Sticks |
 |
| Give the Quarter Square units a nice mist of Best Press |
14. Trim to size the Lemoyne Star Blocks to 12½” x 12½” using your Tucker Trimmer III™. Position your Tucker Trimmer™ ruler on top of the block, line up the “Common Diagonal” with the sewn center seam of the pieced Lemoyne, and the 12½” “Sizing Diagonal” with the seam line intersections the HST and pieced Lemoyne. Cut the two sides (top and side). Rotate the block 180-degrees, lining the just cut edge with the 12½” line and then “Common Diagonal” should fall back into place, cutting the 2 remaining sides.
15. Rotate the block 180-degrees, lining the just cut edge with the 12½” line and then “Common Diagonal” should fall back into place, cutting the 2 remaining sides.
16. Tada! You have successfully completed Block 46! Be sure to post your completed block on the Timeless with a Twist Facebook Group: Timeless with a Twist Facebook Group
I know you can do it! Well I have guest arriving and need to get moving! Remember to check-in in a few days, as I will be release both Block 47 and 48 next week. I will probably release one in a few days and another next Friday!
Merry Christmas to all,
Michelle


Cannot download instructions when I hit the download highlighted area where prompted.
ReplyDelete.
I had no issue to link. https://sewonthego.net/retreats
ReplyDelete