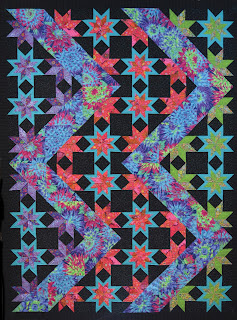
Banded Lemoyne is my favorite of the Lemoyne Techniques. We are going to make (4) Banded Lemoyne Stars for Holiday Sensation, Clue #15! This is one of the tougher techniques, but take it step by step and you should be fine. Make sure you are using your best cutting skills, you will need a perfect 1/4" and good pressing skills to ensure everything comes together well. Basically, everything you have learned these last 14 weeks.
I've combined the Banded Lemoyne and the Lemoyne as Triangle in my Lightning pattern, which offers three sizes. Love it!
For Fabric selection, you will want to make sure you select a more tone-on-tone for the "Band" fabric. If you are selecting your own fabric, now may be a good time to use a fabric that is close in color to your background, since you will be divided it by a band.
 |
| My Starflower Christmas version |
 |
| My Kaffe version |
Take your time to cut your strips and stay organized.
I highly recommend marking your Band Strips to help you with the offset.
Be very careful pressing your strips.
Similar to other Lemoyne Stars, we will stack them and sub cut them.
 |
| Right Handed |
 |
| Left Handed |
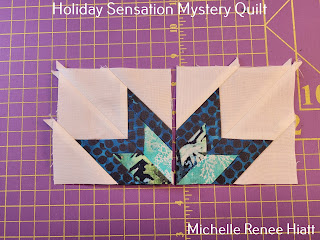
There will be no sub cuts, we actually need to place them a Band Strip. Note A and B will be placed differently, you will want to pay attention to the instructions and graphics. Additionally, I've photographed my A and B sets below.
 |
| My Starflower Christmas version |
Note, for pinning the A and B units I've folded the bottom of A and the top of B to ensure I leave enough space. I will release that prior to stitching.
 |
| My Kaffe Version |
Press carefully, pressing can be tough, take your time and do not distorted them.
To trim them apart, I like to trim the with a ruler and rotary, line up on the bottom of the next unit, leaving as much of the Band on the Banded point.
See here, don't worry that all gets trimmed in the next step.
You will mark the back of your Lemoyne Star tool, as instructed in the directions.
Then, it is time to trim using those newly marked lines.
 |
| Right Handed |
The Band strips get a nice hair cut.
 |
| Left Handed |
Next, it is time to make our Triangles.
You want to lay these out. I have to lay them out and I've been making them for over 8-9 years.
Stitch your A side first, sew on the Large Triangle first.
Trim the dog ear, I do this first one with scissors.
Make sure to pay attention to the pressing, you want everything to next when you are finished.
Next is the B side. Large Triangle first.
You will need to trim the dog ear, I like to use a ruler for the B side.
Press carefully. I can't say it enough.
Next, we need to trim all the A and B triangles down.
 |
| Right Handed |
 |
| Left Handed |
Next we will put them into Quarters.
Take your time and pin!
Press open, carefully.
Trim the dog ears.
 |
| Right Handed |
 |
| Left Handed |
Next, put them together into halves.
Pin, Pin, Pin!
Then, into whole blocks.
Precision pin for sure, make sure to nest and pin.
Finally, trim down!
 |
| Right Handed |
 |
| Left Handed |
 |
| Right Handed 2nd Trim |
 |
| Left Handed 2nd Trim |
Tada!
 |
| My Kaffe version |
 |
| My Starflower Christmas |
Love, Love! Hope you love them too. If you are interesting in making these in other sizes, there is a technique sheet that provides all the math.
Well, we have 3 weeks left, I will be having surgery next week, but I will still be releasing a Clue!
We are almost there.
Keep stitching,
Michelle


Comments
Post a Comment