Holiday Extravaganza Begins ~ Clue #1!
Holiday Extravaganza will star with the Lemon Star, a Lemoyne Star with Cornerstones.
 |
| Holiday Extravaganza ~ Clue #1 ~ Both of Michelle's fabric selections |
While I know many of you just want to get right to the first Clue, I'm hoping you will read through some important items, learn about Medallion Quilts and take time to understand how this series will work.
Important Items - Please read
- Please read the Blog each week.
- Each week I will provided additionally tips for each week’s clue. It is important that you read it to get those extra tips.
- During Sunset on the Sound and Timeless with a Twist series I received an average of 20 emails/instant messages/text, each week, with questions that were answered in the blog. A lot of time goes into putting this together for you, for free, therefore I request that you read the blog, prior to contacting me, to see if your question is answered on the Blog post.
- I always welcome emails from all of you, however it is frustrating to take the time to give you the information, only to received emails asking for the same information.
- Clues will be up for one week only.
- The Clues will only be available from Friday’s newsletter/blog post through to the following Thursday night at midnight.
- It is your responsibility to download the Clues. If you miss downloading a Clue, misplace a Clue, etc., You will need to purchase the missed clues. There will be no exceptions.
- You will have the option to purchase missed clues at the middle of the series and at end of the series for a nominal fee.
- The Clues are for your purposes only.
- Clues are not to be shared; this includes Clues being emailed, copied, scanned, or mailed for others. My Mystery series is copyright protected.
- If it comes to my attention that you have shared a Clue, without my permission, or that you have requested or received a Clue, you will be blocked from downloading the rest of the series and all future series.
- Apologies, unfortunately ill usage of my prior works have caused this me to take this stance. It is sad to think, especially in the quilting world, that someone takes advantage of my weeks of hard work, but it happens. Unfortunately, too much for my liking. I know there are other quilt instructors/authors that leave their downloads up for longer and that is their business. I know that I spend 6-8 hours a week putting together a quality mystery series, with first-rate instructions, and therefore I do not want my hard work being used to provide someone else income. I hope that makes sense.
- Facebook Group - Holiday Extravaganza Facebook Group
- If you join or have joined the Facebook group, please note that it is a friendly environment meant for positively only. It is not a place to pass judgement nor solicit other groups, shops, etc. I’ve set up the group to share this quilting journey. It is meant for Holiday Extravaganza activities, or any of my other designs, classes, or events.
- Respect and Kindness
- Please keep in mind that if you keep up with the Clue downloads and the series, that I’m doing this for free. I ask in return that you consider my classes, retreats, services and products when possible.
- However, more importantly, I asked that you take this into consideration when you go to pen a negative comment/email/message. I try my best, I’m only human, life does happen and I try and deal with it the best I can. So far, in each series, there has been at least one email that makes me wonder why I keep offering these free series. So far, I’ve been able to pull myself off the ground, shake it off and go on. However, it does hurt that people would be so negative. That being said, for the most part I get wonderful supportive emails and thanks, which is why I keep doing the series.
Okay, enough of the serious!
What is a Medallion quilt?
A Medallion quilt, by definition, is a quilt that has a central motif and is surrounded by multiple borders or multiple blocks forming borders. The central part of a Medallion quilt is a quilt block, which can be traditionally pieced, an appliquéd piece, or a whole cloth piece of printed fabric.
Regardless of what the center is comprised of, a Medallion quilt is “built” by adding multiple borders or multiple blocks forming borders, around the center portion of the design.
Given the multiple blocks, it is almost a Sampler quilt. However, the difference is in the number of each of the blocks. A Sampler quilt often has one of every block. Whereas in a Medallion quilt, with the exception of the center block, there are traditionally four, eight, or sixteen of each block in a Medallion quilt. That is due to the fact that they are often arranged equally in all four border surrounding the center.
Stunning Medallion quilts often utilize many different quilting techniques. Some borders are simply solid pieces of fabric that allow a “resting” place for the eyes in a quilt with so many different design elements.
Quilt historian Barbara Brackman explains “Early quilts often have a central design focus, a setting style Americans tend to call a Medallion quilt and the British call framed quilt or frame quilt. The terms seem to date only as early as the twentieth-century, possibly established in 1929 by quilt historian Ruth Finley who described a quilt with a tree-of-life center as a ‘framed Medallion’ in her book Old Patchwork Quilts: And the Women Who Made Them.”
For Holiday Extravaganza, my Medallion Mystery Quilt Series, we have one center block and then we will create multiple borders using multiple blocks.
- Each week you will get instructions for one 12” block or four 6” Blocks.
- The blocks will not necessarily be in the order to complete borders, as I’ve needed to take skill and schedule into account.
- However, whenever we are able to construct or add borders, I will provide border instructions in addition to that week’s block(s) instructions.
Therefore, it will be important for you to stay organized and label each block upon completion, as we will have many different blocks.
- The Blocks and Borders will create a secondary element when completed, so it is important that you construct the Borders following my instructions.
- The quilt will finish at 64” x 64” without a domain traditional border.
- With a traditional border, it will finish at 76” x 76”.
Fabric Requirements - Can be downloaded: Download here (scroll to the bottom)
Changing the size:
- If you want to make the quilt larger, I would purchase extra fabric, but wait to the end when the mystery is revealed to determine the additional blocks you may want to add or duplicate.
- If you want to make the quilt smaller, I would wait until the mystery is revealed, and determine if you want to leave off the border and possibly the finishing blocks/border.
- I would not make the blocks smaller. Many of these blocks have different segments which will make it difficult to broadly change the size of the blocks.
I hope all of this makes sense. One more thing.
Fabric Cutting Approach
I covered this my fabric cutting approach during my Timeless with a Twist Series, but I want to restate it for the newbies and to refresh your memory.
- When cutting your fabric for this block, go ahead and cut full strips of your fabric, whether it be background or your fat quarters.
- Don’t make Swiss cheese of your fabric.
- Go ahead and cut those 2” strips for the squares.
- Just save the rest of the strip, I guarantee in an upcoming block, you will use some or all that strip.
- When working on a Medallion or Sampler Quilt, I always end up with 3 sections of my storage bag/box.
- (1) Uncut, still in tack Fat Quarters or yardage.
- (2) Partial Strip/Scrap bag for the remainder of any strip I cut.
- (3) Partial Fat Quarter Bag for the balance of the Fat Quarters, anything wider than 8” I will stack and keep together in the Partial Fat Bag. Anything smaller than 8” will go in the Partial Strip/Scrap bag

- Down the road:
- Once I pick the fabric I want to use in a new block, I go back to the Partial Strip/Scrap Bag, to see if anything already cut will works.
- Once I’ve made the first cut into the majority of my Fat Quarters, I will go back and start selecting from my Partial FQ Bag. This way, I’m making sure I use all my fabric.
- Hope this makes sense; You can find additional details at: Blog Post
Okay, here we go (in my best Ryan Seacrest voice), let's talk Clue #1
This is a great block to use those directional fabrics (if you have them)! It will provide some added interest.
I've provided detailed measurements and numbers in the download, that is available through Thursday, May 23rd, however below I've detail additional tips plus pictures!
Let's get started!
1. Gather Medium #1 and Medium #2 strips, these will be your Star Strips and the Background Strips.
2. Pair the Star Strips with the Background strips to make strip sets. Place two background strips right sides up, laying side by side, see photo below. You can mark these as stated on the Tool instruction and the download, however, I typically fold it at a 45 degree angle, creating a "house" and place the strips inside the "house.

3. Stitch the strips using a ¼” seam. I chain stitch these going from end to end.
 |
| I start at the top and stitch through the background strip |

 |
| Chain piece the next strip |
 |
| And finish by stitching through the background strip |
4. Press A Strip Set towards the Background Fabric and Press the B Strip Set towards the Star Fabric.
 |
| Press A to the Background Strip |
 |
| "B" a star - Press B to the Star Strip |
- Note that if you are right handed, you will want to place the "A" strip on top and place the end marked "tops" on the left hand side of your cutting mat.
- If you are left handed place the "B" strip on top and the end marked "tops" on the right hand side of your cutting mat.
- See diagram below. In both cases the star strip should be closest to your body and the background strip furthest away. Proper positioning here will allow you to easily cut the 45° angled slices.
 |
| If you are Right Handed, the Strip Strips create a right tail. If you are Left Handed, this is reversed |
6. Set the 45-degree angle using the Rapid Fire Lemoyne Star™ tool (RFLS). Right handers cut from lower right to upper left. Left handers cut from lower left to upper right. The illustration shows its placement. By lining up the ruler edge with the stitching line as shown and bumping another cutting ruler up against the angled edge. Pull the RFLS away and make the 1st cut. See diagram.


7. Continue making 1st Cuts — 45-degree angle cuts the width of your star strip across the length of the strips, checking your angle with the RFLS Ruler, until you have a total of (4) pairs, keep your pairs of pieced units together.
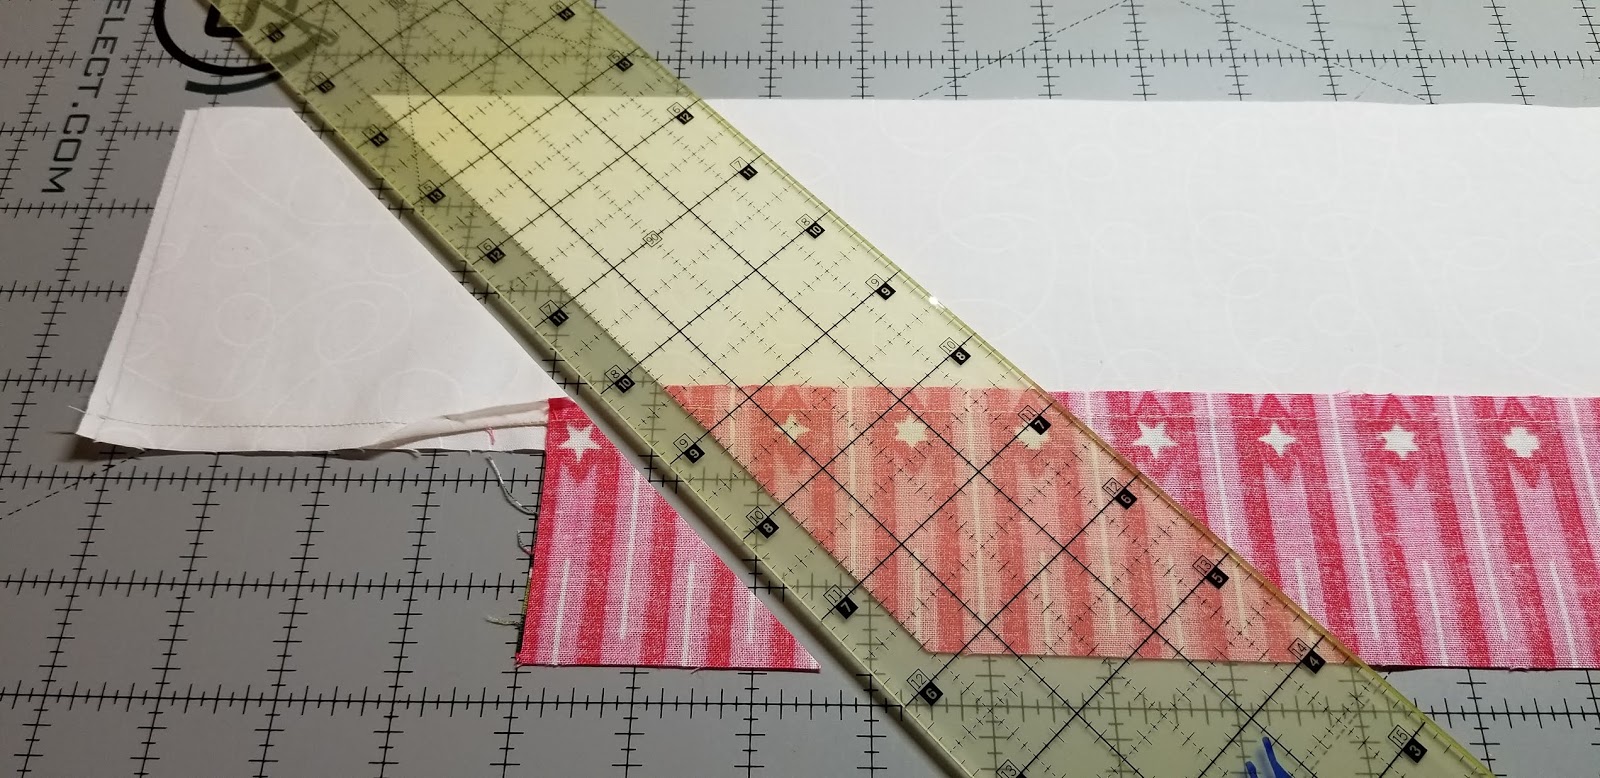


 |
| Right Handed - Line up a straight line of your ruler, on the top edge and move the ruler over until it "kisses" the tip of the strip |
 |
| Left Handed - After you make your cuts, flip the unit (east to west) and line up a straight line on the ruler with top of the seam and just cover the tip of the strip |
 |
| Perfect |
 |
| Repeat for all 4 |

 |
| Always sew with the Diamond on the top - oversized triangle on the bottom |
 |
| Diamond on top |


Right Handed
 |
| Right Handed ~ 2 o'clock |

 |
| Left Handed ~ 10pm |

 |
| Pin! You will pin now or rip later |
 |
| Don't put the Diamond point in first, it may get sucked into your machine |
13. Stitch the pieced triangle units together, first into pairs, I prefer to stitch from outer star inward to the center, so that little point doesn’t get sucked into your machine. Use your best ¼" seams! Focus on aligning the star centers and all pieced seams. See diagram. Press seam open, use the Pressing Stick, there will be less bulk and the seams will match up better in the center. Trim the “Dog Ears”.
 |
| Set the Seam |
 |
| Press on the Pressing Stick |


 |
| Trim the dog ears! |
 |
| See IT |
 |
| Pin IT and Sew IT |
 |
| Set IT |
 |
| Press IT over the Seam Stick |
 |
| Pin IT and Sew IT |
 |
| Press IT open over the Seam Stick |
 |
| Give it a nice press and a mist of Best Press |


The challenging part is over, now lay out and stitch!


Whew! We made it!
In case you haven't figured it out, The Lemon star will be our central motif/block.
I hope you will join and share your blocks on Holiday Extravaganza Facebook Group. Remember to answer the screen questions or you will be automatically declined access to the group.
Well, I have a busy weekend ahead, I have to get my Majesty Lemoyne complete and ready for the printer. Plus, I'm heading to the Piecemakers Quilt Guild, Middletown PA this week to give a lecture (Wednesday evening) and my Bloom Workshop (Thursday). If you are in the area, I hope to see you!
Have fun with the Clue #1!
Keep Stitching,
Michelle


Comments
Post a Comment