Whimsical Wonder is Clue #7 - It is really a fantastic block! I'm introducing the Corner Beam officially to the series. So, we will be making Corner Beams with the Corner Beam tool and Shaded 4-Patch Unit with our Tucker Trimmer tool So tada!
First, I wanted to invite you to join me on Wednesday, May 25th, when I go LIVE on Facebook to take questions on the current Mystery, (remember it is a Mystery), questions on the next Mystery, last Mystery, upcoming retreats, patterns, etc. It will be Wednesday, 7pm EDT. You can RSVP and get a reminder at: FB Event - Ask me Anything
Hopefully, I can keep the Mystery a Mystery. LOL!
So, back to Glorious Splendor. I'm just loving this Mystery and hoping you are too.
For my Fabric Selection I went with a mix of color and prints. For the Medium and Med-Dark, I would try and select fabric that is in the same color way but slightly different shaded and style of print.
Introducing a new tool and technique to the series, the Corner Beam. Be very careful cutting the Center Beam.
 |
| Right Handed - Make sure to use the dotted line and the proper size line |
 |
| Right Handed - for the second cut take your time to line up the Dash..Dot..Dash line and have the tool at the top of your square. |
 |
Left Handed - Make sure to use the dotted line and the proper size line
|
 |
| Left Handed - for the second cut take your time to line up the Dash..Dot..Dash line and have the tool at the left of your square. |
My biggest recommendation, is to make one Corner Beam unit end-to-end first.
 |
| Have the beam going away from you. |
 |
| Always place the Center Beam on top when sewing and make sure to check for that 1/4" off set. |
 |
| Once sewn and pressed (be very careful), turn your plate around. |
 |
| Again, make sure you sew with the Center Beam on top for that second Side Triangle. |
 |
| When prepping for trimming, always have the Beam coming toward you. "Beam me up Scotty" - Beam to me. |
 |
| Right Handed above- Be careful not to pull the seam lines of the Corner Beam Tool into the Beam, you will short change yourself your 1/4" in that corner. Left Handed below. |
 |
| Right Handed above- Turn your unit and take the time to line up the proper size, the proper little V and the hashmarks. Left below. |
 |
| Tada! |
You have been making the Diamond Rects for several clues, so I will skip tips on that. Just be sure to check for the proper size. Check prior blog post for additional tips.
New Unit to the series - Shaded 4-Patch Unit, one of my favs! This is a really cool technique, there is a Shaded 4-Patch Technique Sheet that offers all the measurements for alternate sizes.
Here are a few tips.
 |
| Always press toward the wider strip (even if it is background) |
 |
| Cut the strip in half. |
 |
| Place them right sides together, opposite each other. |
 |
| Make your sub cut and sew. Sew with the patch closest to you, if you want the diagrams and photos to match. |
 |
| Once sewn, you will want to "nip" it in the middle. I like to "just" cut through the stitching line. |
 |
| Then press away from the squares |
 |
| Press well from the back and the front |
 |
| My Paisley Rose version |
 |
| Next you need to draw 45 degree lines that intersect the seams of the square (not the square) - Left Handed |
 |
| See the 2 lines |
 |
| Right Handed |
 |
| I like to pin my units just to make sure they stay together nicely. |
 |
| Here it is sewn. |
 |
| I'd recommend cutting it a 1/4" off each seam. There is a little more than a 1/2" in between, which may give you a bulky seam. |
 |
| Next is trim down, and you want to make sure you are trimming the side with the square first, as it is the most pieced. Right shown |
 |
| Turn 180 and line up again to trim. |
 |
| Next is trim down, and you want to make sure you are trimming the side with the square first, as it is the most pieced. |
 |
| Turn 180 and line up again to trim. |
 |
| Tada! |
Block construction!
 |
| Layout your Shaded 4-Patch Units |
 |
| Due to the seam, I'd recommend double pinning and starting with a leader. I didn't flip half the seam, to be able to nest, because I didn't like the seam going against the patch. I found the double pinning worked. |
 |
| Once I got the rows sewn, I double pinned again when putting the center together. |
Highly recommend marking the Corner Beams seam with a 1/4" mark to help with pinning.
 |
| If you look closely you can see the 1/4" marks above. |
Lay out your block carefully, making sure you have the correct orientation of your Corner Beams.
 |
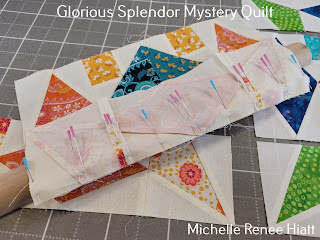
| You will want to precision pin these points - Well, I wanted to. I'd rather sew take the time to pin than to un-sew later. |
 |
| The pinning for my Corner Beams and Diamond Rects |
 |
| My pinning for my Center and Diamond Rects. |
 |
| Make sure to put everything back in place the right way. |
 |
| Then, it is time to precision pin again, in all the same places. |
TADA!
 |
| Bermuda Batik version |
 |
| My Paisley Rose version |
I'm really loving this series, I hope you are too. I'd love to hear your thoughts. Join me on Wednesday, May 25th, when I go LIVE on Facebook to take questions on the current Mystery, (remember it is a Mystery), questions on the next Mystery, last Mystery, upcoming retreats, patterns, etc. It will be Wednesday, 7pm EDT. You can RSVP and get a reminder at: FB Event - Ask me Anything
Hope to see you there!
Keep Stitching,


Comments
Post a Comment